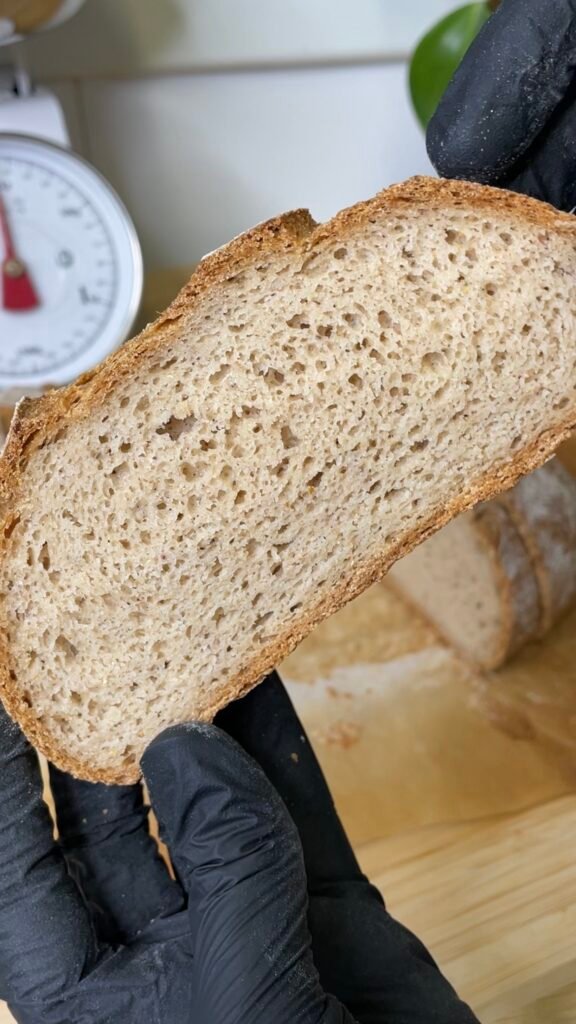
Gluten Free Beer Bread
The recipe for this Gluten Free Beer Bread was inspired by a recipe posted by Lilia Weinroth, on her Instagram page, and I was very intrigued.
I was familiar with gluten-filled beer breads, but never thought of trying it as a gluten free version.
I’ve made some of my own adjustments and changes to the original recipe, which calls for using storebought gluten free flour blend.
There’s a repeated question I get from celiac followers about recipes I develop using individual gluten free grains flours.
My response is always the same – it is mainly *because* I’m not celiac, my interest in storebought gluten free flour blends is very small, as they’re mostly composed of starches (which ends up being similar to plain all purpose flour, which at it’s most a starch), but also contains a lot of binders and additives, which I am personally reluctant to consume.
These binders and additives are not imperative when making gluten free bakes, and you can make wonderful gluten free pastries even without them.
Individual gluten free grains flours contain a lot of nutrients such as proteins, vitamins and fibers, and using them is a natural choice for me.
Unfortunately, there’s some degree of hesitation among celiacs reading a recipe which calls for 4 or 5 different types of flours, without understanding that combining several flours in a single recipe is actually an advantage.
I’d like to reassure you that even if such recipe seems complicated, it’s nothing but an illusion. Once you get used to working with gluten free grain flours, it’s very hard to go back to using storebought blends, no matter how good they can be.
In any case, all of the explanations on how to make this wonderful bread are written down below, and this time I’ve composted a flour blend which would complement the maltiness of the beer, and I’d actually recommend baking this bread in a loaf pan to make it rise better in the oven, as it tends to spread out a bit in the oven without the support provided by a baking tin.
If you’re interested in preparing a preferment for this bread, I’ve added more notes at the bottom of this recipe.
First published:
Last modified:
Gluten Free Beer Bread
Equipment:
Loaf pan sized: 20cm (l) x 7cm (h) x 10cm (w), lined with parchment paper.
Recipe makes a single loaf of Gluten Free Beer Bread
Flour mixture (360g):
| Ingredient | Amount (g) |
| Brown Rice Flour | 90g |
| Sorghum Flour | 60g |
| Oat Flour * | 90g |
| Potato Starch | 60g |
| Tapioca Starch | 60g |
* If you’re sensitive to oats, you may substitute the oat flour with the same amount of Light Buckwheat Flour.
The final flavor and texture are expected to be slightly different compared to the original recipe.
For the Psyllium Gel:
| Ingredient | Amount (g) |
| Whole Psyllium Husks | 25g |
| Gluten Free Beer of your choice | 325g |
| Water | 70g |
The Dough:
| Ingredient | Amount (g) |
| Flour Mixture | Entire Amount |
| Psyllium Gel | Entire Amount |
| Salt | 9g |
| Olive Oil | 24g |
| Dry Yeasts | 9g |
Preparation instructions:
For the Dough:
- Prepare the psyllium gel: Into a medium sized bowl, add the psyllium, beer and water, and thoroughly mix them together. Set to the side until a gel forms, at least 20 minutes.
- Into a standing mixer bowl, fitted with the paddle attachment, add all the dry ingredients: flours mixture, yeasts, and salt, and mix them together.
- Into the mixer bowl add the psyllium gel and olive oil, and start mixing on the lowest speed for 5 minutes. Occasionally stop the mixer as needed, to scrape the sides and bottom of the bowl with a rubber spatula or a flexible plastic bench scraper, in order to encourage uniform mixing. The dough should be smooth slightly tacky to the touch.
- Transfer the dough to a separate bowl, cover with plastic wrap, and let it rest in the refrigerator for 40 minutes. During this time, the butter and psyllium will set the dough so it can be shaped easily.
Shaping and Proofing:
- Dust the counter with some gluten free flour blend (any storebought blend you have at home will be fine, and I recommend using a little sieve to help dusting the flour evenly). Place the dough on the floured counter and dust the top of the dough with some flour as well. Note to go easy with dusting the dough as it is very nice to work with.
- Roll the dough to a rectangle the size of 35cm (l) x 20cm (w), and give it a letter fold.
- Elongate the resulting rectangle by rolling it to a longer rectangle to make the thickness even all across (the exact length is not important, but the width should be the same as the length of your baking tin). Roll the dough to a log, starting from the top, working your way all the way down, and seam the edges with pinching the dough together to seal it.
- Transfer the loaf to the prepared pan, spray it with water, cover with plastic wrap and proof it in the refrigerator for 1 hour and 15 minutes.
Baking:
- After proofing, take out the plastic wrap, and you may also score your bread (if you skip this step, generously spray the bread with water before baking it).
- Bake the bread in a preheated oven set to 190C (conventional oven), placing a baking rack at the bottom of the oven, COVERED, for 20 minutes (use an extra baking tin the same size, or create a tent made of aluminum foil, securely tightened above the pan to allow the bread to rise).
- After 20 minutes, UNCOVER the bread, and continue baking for 50 more minutes.
- Once done, immediately unmold the bread from the pan and place it directly on a cooling rack, allowing it to cool down completely (3-4 hours) before slicing.
Notes:
If you’re interested in making a preferment:
About 8-12 hours prior to making the bread, in a small bowl, mix 108g of the flour mixture, together with 1/8th tsp of dry yeasts and 1 tsp of sugar. To that, add 70g water (originally used to make the psyllium gel) and mix together to get a uniform, smooth and stiff dough.
Spray the dough with water, cover the bowl tightly with plastic wrap, and let it ferment at room temperature for 8 – 12 hours.
Add this preferment to the mixing bowl along with the rest of the ingredients during the kneading stage of the dough.