Tempering Chocolate
Tempering Chocolate in the Microwave
I’ve created this separate learning article to provide you with some full-length written guide for tempering chocolate in the microwave. Tempering chocolate may sound a bit intimidating for novice bakers, and they single handedly reject the thought of even trying it.
The purpose of this guide is to demonstrate that tempering chocolate at home doesn’t need to be all messy or complicated at all.
You will, however, need to be equipped with the right tools for the job, because accuracy is still key to your success.
What is tempering?
Tempering is all about temperature control. It is a process in which we artificially raise or lower the temperature of an object, in order to achieve desired results. Tempering is not exclusively related to chocolate, and temperature controlling can be utilized in other industries, for example; glass needs to be heated to a certain temperature in order for it to be possible to shape it. Upon cooling down, the shape sets and we get a beautiful glass sculpture. Similar process is followed using metals to form them into different shapes.
But we’re not here to discuss glass or metal shaping. This article is about tempering chocolate. So, in essence, and without getting too scientific about the molecular structure changes happening during the tempering process- by heating and cooling the chocolate, we can get it to conform to different shapes, mainly, chocolate molds, and make something entirely new, that looks very different than what we initially started with.
The process was also captured in the below video, so you can refer to it in case you need it.
Table of Contents
1. Equipment to be used:
- High quality chocolate- there are no compromises here. The chocolate used for tempering must be real chocolate, i.e., contains cocoa butter, and preferably from a respectable and familiar chocolate brand. To name just a few: Callebaut, Lubeca, Valrhona and more. They don’t have to be very expensive, but make sure that they taste good to your liking, because that is mostly what will determine the taste of the final product.
- Polycarbonate chocolate molds- these molds are made of unique substance called polycarbonate. It has a very thin coating that promotes chocolate crystallization, and therefore allows the end product to get its trademark shine and gloss. Silicone molds or plastic molds will not work right here, and will lead to undesirable results. These molds are expensive, but you can occasionally find great deals at baking supplies stores, so keep your eyes peeled for sales.
- Candy thermometer- they can come either as probe or laser thermometers. The probe candy thermometers are more accurate, but also a tad more annoying to use, because you need to clean them after each measuring. I find that using laser candy thermometer can be very accurate if working correctly, and saves you a lot of trouble cleaning during the process.
- Piping bags- as part of my “working clean” agenda, I prefer using disposable piping bags when tempering chocolate, in contrary of using measuring jugs. It allows for better control of how much chocolate is poured into the molds, and you don’t end up losing any waste. The main downside is the slight environmental concern, as expected with any process that is making use of disposable equipment. On the other hand, I do not anticipate that home chocolate factories are going to pop up all across the country any time soon, so the waste is still kept to a minimum.
- Chocolate scraper, or a cake scraper- make sure to use the metal ones. They should be as wide as the mold’s width, to ensure we can scrape the excess chocolate off the mold.
- Digital scales- we are working with precise amounts, and we constantly need to keep track of the amount of chocolate being used as we go.
2. Methods:
Tempering chocolate is a cyclical procedure which always repeats the same steps, and will be covered in full length, further down this article:
- Creating the shell – this step is all about creating the “shell”, which is the thin layer of chocolate (or praline) coating the filling.
- Filling- in this step, the chocolate is being filled with delicious fillings, commonly flavored ganache.
- Sealing- this step is for closing on the filling, using tempered chocolate. It is also the most complicated one to do in this method.
Quantities:
One key question related to tempering chocolate; is how much chocolate do we need?
The answer to this question depends on what kind of mold you have on your hands, and it can range between 250g – 500g chocolate, per one mold:
- If the mold has a great number of deep holes- you will need a large amount of chocolate.
- If the mold has fewer holes, that are also shallow, you won’t need just as much.
Overall, there’s a lot of trial and error in determining how much chocolate you will need to make one batch of chocolates. But you must remember that you don’t necessarily need to utilize all holes inside the mold to enjoy tempered chocolate. And even if you used too much, the excess chocolate can always be re-tempered, and stored safely until the next time you need it.
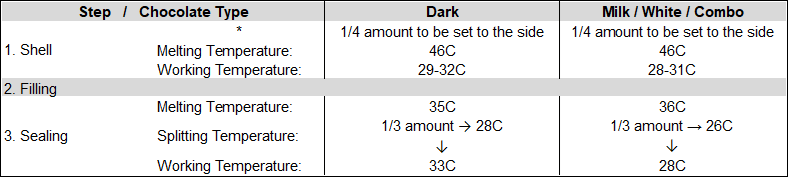
The steps can be summarized in the below table, and don’t worry, I will be covering each step separately.
I would also like to add, where it says Combo, the intention is a combination of both milk and white chocolate, mixed together. Milk and white chocolate have the same tempering conditions, which allows them to be mixed together to form more diverse shades of brown, depending on the ratio of milk to white chocolate used. Please do not mix milk or white chocolate together with dark chocolate in an attempt to temper it, as it will not work.
For the purpose and simplicity of the following examples, I will my demonstrate calculations and explanations based on 250g of dark chocolate. Please adapt the amounts and temperatures, based on the type of chocolate you use for your tempering.
3. Step 1 – Creating the shell:
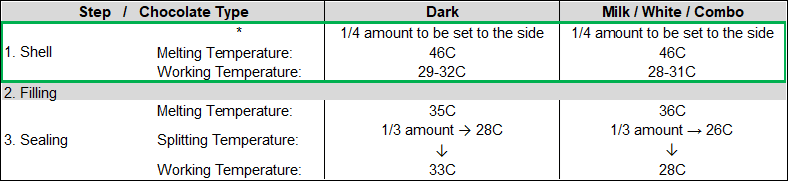
As mentioned above, in this step, we need to temper the chocolate so it can be used to create the shell of the praline. First and foremost, please measure your bowl’s weight, and write it down as it will be used to calculate various numbers along the way.
- Assuming 250g of dark chocolate is used, in the first step we need to take out 1/4 of that amount (63g), set it to the side, and finely chop it.
- The rest of the chocolate is placed in a microwave safe bowl, and heated in pulses of up to 30 seconds (maximum), stirring in between pulses. Microwaves do not cook food evenly, and you therefore must watch the chocolate very closely, stirring it in between pulses to ensure it doesn’t burn. The chocolate temperature needs to be raised to 46C, and it must be fully melted. If you accidentally raised the temperature higher than 46C (as controlling the heating force of the microwave is quite challenging), do not panic. Simply keep agitating the chocolate by stirring it inside the bowl, until its temperature drops to 46C. This is called “The melting Temperature”, as it is the temperature at which the chocolate needs to be fully melted in.
- As soon as the chocolate reached 46C, add in the chopped 63g of chocolate, and mix it together with the melted chocolate. The chopped chocolate will lower the temperature of the melted chocolate, facilitating the crystallization process, however we sometimes may notice that the chocolate cools down faster than expected, and the chopped chocolate didn’t have a chance to be fully melted.
For this reason, the chocolate must be chopped as finely as possible, so it would melt completely and effortlessly when added into the larger batch. If the chopped chocolate is still visible in the mass, return the bowl back into the microwave for a few more seconds, to re-heat it, and encourage the rest of the chocolate to melt. Don’t worry, as this won’t be ruining the tempering process. - Once the temperature dropped to 32C, the chocolate now entered the “Working Temperature” For dark chocolate, this range is between 29C to 32C, and it is the optimal temperature range the chocolate can be worked with.
- Transfer the chocolate immediately to a piping bag and cut a small hole at the tip. Start piping the chocolate into the mold, making sure it fills up all the way through the holes. Return any leftover melted chocolate left in the piping bag, back into the bowl.
- Tap the mold on your counter to release tiny air bubbles. All of that stirring of the chocolate, forcing it to cool down, incorporates a lot of air in the form of tiny air bubbles into it. It is very important to get rid of this air after filling our mold, because it gets in the way of creating a seamless shape, and will be visible in the end product.
- Prepare a baking sheet that is as at least as large as your mold, but small enough to fit inside your refrigerator or freezer and line it with parchment paper
Flip the mold upside down, over the baking sheet, and let all the chocolate drop from the holes, down on the parchment paper.
Using a rolling pin, knock any stubborn chocolate out of the mold. The intention here is to release the excess chocolate, so that we will have a thin shell, but it’s also important to not overdo it.
- Once most of the chocolate is released, flip the mold upside down again, and using your chocolate scraper, scrape the excess chocolate in one swift motion, from one edge of the mold, to the other edge, in a 45 degrees angle. This excess chocolate will also be added to the rest of the chocolate that is already on the baking sheet.
- Place both the mold and baking sheet with excess chocolate inside the refrigerator, and chill for at least 10 minutes.
4. Step 2 – Filling:
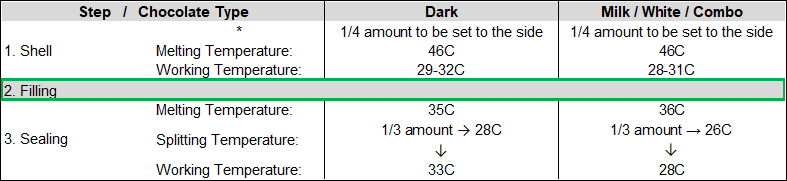
While the chocolate sets in the refrigerator, it is time to prepare the filling. The filling is commonly a flavored ganache, made with chocolate, heavy cream, and some liquor. Sometimes, additional inclusions are added such as chopped or whole nuts.
It is important that the filling is used when it reaches room temperature. This way, it is still liquid enough to fill the pralines easily, and not too hot, which would otherwise cause the thin shell to melt.
You can prepare the filling in advanced, and the amounts of filling needed for each preparation also depending on the size of mold you have.
In any case, by the time the filling is prepared and cooled down, the chocolate shells have already set and you can start filling them in. Make sure the chocolate lost its shine before you fill it with the filling.
When filling the chocolates, make sure you fill it about 80% the height of the hole, so it doesn’t overflow. Otherwise, you may have trouble sealing the chocolate.
Once all holes are filled, lightly tap the mold on your counter so that the filling will evenly flatten across all holes, and refrigerate the mold for at least 10 more minutes, so the filling sets.
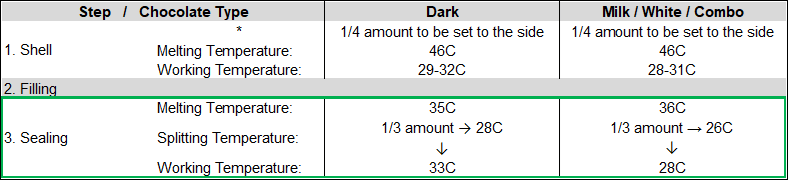
5. Step 3 – Sealing:
This step is the most complicated steps, but once you get the hang of it, it is very easy to repeat.
- Take all the excess chocolate that was stored in the refrigerator on top of the baking sheet, and should have solidified by now, and break it into smaller pieces. You can also preferably chop it. Place it in the same microwave safe bowl that you have used initially. You should now weight the total amount of “bowl + chocolate”, and since we already took note of the weight of the bowl from earlier, you should be able to know how much chocolate you have left to use. Let’s assume you have 175g chocolate left for the sealing step.
- Melt the entire amount of chocolate to 35C, which is again the “Melting Temperature”, at which the entire amount of chocolate needs to be fully melted. Again, if you hit a higher temperature, it is ok, as long as you lower the temperature down to 35C.
- While you are getting the chocolate to the right melting temperature, I highly recommend you to take the mold out of the refrigerator, and let it wait at room temperature while you continue tempering the chocolate.
- Into a separate smaller bowl, take out 1/3 of that amount (58g), and continue stirring it separately, until its temperature drops down to 28C. This is called the “Splitting Temperature”, as it represents the temperature of the portion we have just split from the larger batch of chocolate.
- As soon as the temperature reaches 28C, return the 58g of chocolate back into the larger batch of chocolate, and continue stirring the mass until the temperature drops down to the Working Temperature of 33C. There is no range here as before. Which means you need to immediately transfer the chocolate to a piping bag, and start sealing the chocolates.
Recall that the mold was taken out of the refrigerator when we just started this step. If it had waited in the refrigerator, it would’ve been quite challenging to seal the chocolates, because the tempered chocolate would’ve hardened too quickly. - Pipe the tempered chocolate over each one of the holes, and rapidly tilt the mold so ensure the holes are fully covered.
- Place the baking sheet in front of you again, and using your chocolate scraper, scrape the excess chocolate in one swift motion, from one edge of the mold, to the other edge, in a 45 degrees angle.
- Refrigerate the mold for at least 1 hour to allow the chocolate to fully set. Any excess chocolate you have left can be used to make ganache, or re-tempered in the same manner, and stored for future use.
- Once the chocolate has set, and assuming you followed all steps accurately, you should flip the mold over your counter, knocking on it once or twice should be enough for the chocolates to easily release from the mold. If they are too stubborn and won’t come out, it can be either because:
- The chocolate is just not set enough. Try freezing the mold for one hour and give it another try.
- There’s a thick layer of chocolate that remained during scraping off the excess chocolate. That layer may seemingly look thin, when its actually too thick and prevents the chocolate from releasing out of the mold. Try to give the mold a gentle scrape and see if this helps the chocolate come out.
- The tempering process was not successful and you may want to repeat it again.
6. Cleaning:
Yes, nobody talks about the dark side of this wonderful experience, which is cleaning the molds and equipment. Luckily, I am here to give you some pointers. Just remember that chocolate is mostly fats and sugars. And while sugars easily dissolve in water, fats don’t. So avoid littering your sinks with chocolate, as it can cause draining issues.
- For silicone spatulas- the chocolate should’ve hardened on the spatulas when they are set aside enough time. Simply peel off the chocolate from the spatulas, and discard it.
- For the chocolate molds- take a very large and deep container (about 6 or 7cm deep), and fill it with warm water about 75% of the way. Note that the water should be around 50-60C degrees. Add a little bit of gentle liquid dish soap to the water and mix it in. Place the molds inside the container, and allow them to sit there for about 30 minutes. The gentle heat will melt all the cocoa butter residues left on the molds, which can then be rinsed and further lightly scrubbed with a soft dish sponge.
Do not use a rough scrub or strong detergents on these molds, as it will ruin their coating.
7. In conclusion:
Tempering chocolate is not the easiest thing to do, but it certainly shouldn’t be considered the hardest. As with almost any skill you gain in life, this one also takes a lot of practice, and remember that practice makes perfect. Making your own chocolate can feel like a very rewarding sense of achievement, and it is one of the most unique gifts you can share with your friends and family.