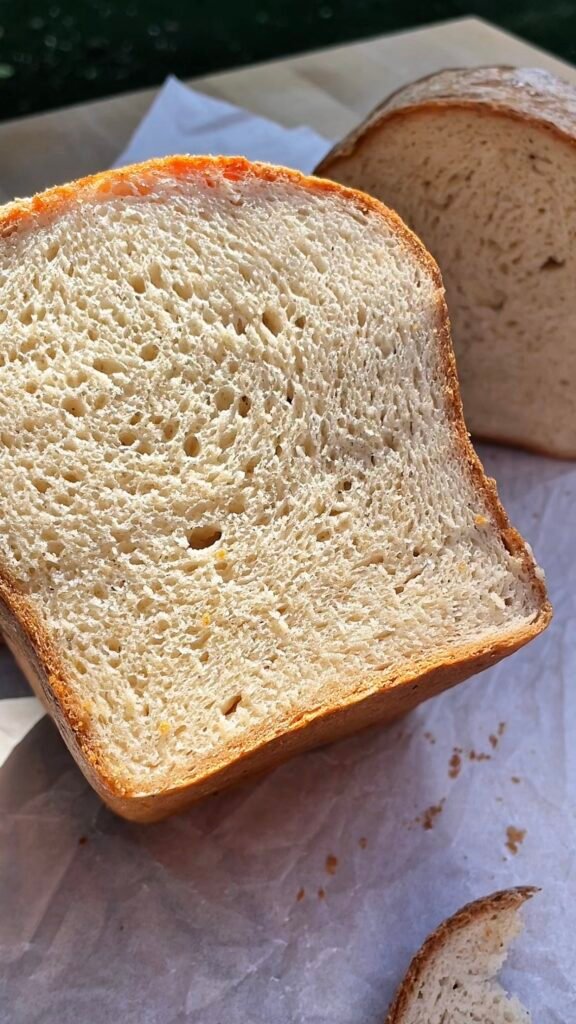
Softest Gluten Free White Bread
The softest gluten free white bread, is something I’ve been eyeing for quite a long time, and really wanted to make it turn out the closest to the gluten filled bread as much as possible. I believe I made it this time.
In the past I tried other variations of this recipe, which included eggs and milk, to add softness. However, this is a bit of an issue considering kosher traditions, and also adds potentially harmful allergens.
I am sharing this recipe due to the many requests I’ve received from parents to celiac children, for a bread that could be enjoyed by kids, as they are turned off by the strong flavors of whole grain gluten free flours such as buckwheat or quinoa.
This requires the recipe to lean more towards the “starchy” side of the gluten free grain flours – but hey, the gluten filled option is just as starchy is this one, with little to no other nutritional values.
The most important thing is to make the kids happy (:
First published:
Last modified:
Softest Gluten Free White Bread:
Equipment:
Loaf pan sized 20.5 cm (l) x 11.5 cm (w) x 7 cm (h), lined with parchment paper (it’s recommended to have two of the same size, as the other pan will be used to cover the bread during baking).
Recipe makes one loaf of softest gluten free white bread:
Flour mix:
| Ingredient | Amount (g / units) |
| Potato Starch | 165g |
| Tapioca Starch | 45g |
| White Rice Flour | 100g |
| Brown Rice Flour | 90g |
Psyllium Gel:
| Ingredient | Amount (g / units) |
| Whole Psyllium Husks | 20g |
| Honey | 20g |
| Apple Cider Vinegar | 10g |
| Water (Tepid) | 450g |
To make the dough:
| Ingredient | Amount (g / units) |
| Flour Mix | 400g |
| Psyllium Gel | 500g |
| Salt | 10g |
| Dry Yeasts | 10g |
| Baking Powder | 10g |
| Xanthan Gum | 9g |
| Canola Oil | 25g |
Preparation instructions:
To make the psyllium gel:
In a medium sized bowl, mix together the psyllium husks, honey, vinegar and water to combine, and set aside until the mixture gels, about 15-20 minutes. Meanwhile, mix the other dough ingredients.
To make the dough:
- Into the bowl of a standing mixer, add the flour mixture, yeasts, salt, baking powder and xanthan gum, and give them a good mix.
- Add in the psyllium gel and oil, and using the paddle attachment, mix on low-medium speed for 5 minutes. Occasionally stop the mixer and using a silicone spatula or a flexible bench scraper, scrape the sides and bottom of the bowl, as well as the paddle attachment in order to better combine the ingredients together.
The final dough consistency should be very smooth without any lumps, and it’s going to be slightly sticky. - Transfer the dough to a separate bowl, cover with plastic wrap and refrigerate for 30 minutes.
Shaping and baking:
- Dust your counter with any gluten free flour blend you have at home, and place the dough on the floured counter. I recommend using a small sieve to control the amount of dusting.
- Give the dough a good dust of flour from all sides. Using a rolling pin, roll the dough to a rectangle sized 30cm (l) x 25cm (w).
- Give the dough a letter-fold, and lightly fltten it with your rolling pin.
- Roll the dough to a log, seaming the edges together by lightly pinching with your fingers.
- Transfer the bread into the prepared loaf pan, generously spray it with water, then using wet hands push it down into the pan to make the surface of the bread flat. Attach a piece of plastic wrap directly onto the dough and proof it in the refrigerator for 75 to 90 minutes.
- Towards the end of proving time, pre-heat your oven to 190C, fan mode off, placing a baking rack at the lowest part of the oven.
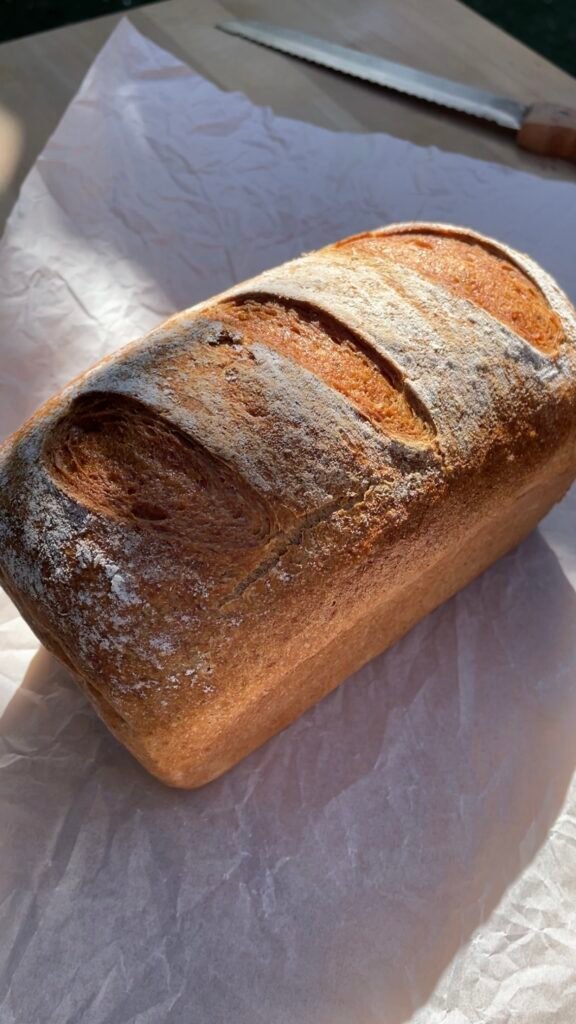
- Just before placing the bread in the oven, it is recommended to score the bread however you like so it can rise better during baking. Cover the bread with a second, same size loaf pan- this helps create a steamy environment for the first minutes of baking which contributes to better rise. The bread will be very tall so make sure to use a tall loaf pan as cover.
- Bake the bread covered for 25 minutes. Then, uncover, and continue baking for 35 more minutes (total 1 hour of baking).
- Unmold immediately from the pan and place on a cooling rack. Detach the bread immediately from the parchment paper, and while still hot, give it a light brush with vegetable oil on all sides and bottom.
- Allow the bread to cool down completely, 3 – 4 hours, before slicing it.
Storage tips:
The bread can keep its soft texture for 3-4 days at a nice room temperature, if stored properly.
It is recommended to slice it only when you want to eat it, and I usually put it into a ziplock back (removing all the air first) then put it inside an airtight container (double protection from the drying air).
As with any other gluten free bread, this bread can also be sliced in advanced and frozen.