Gluten Free Double Chocolate Sweet Rolls
This crazy recipe for gluten free double chocolate sweet rolls, contains brown teff flour, filled with delicious and decadent chocolate filling, which is also used for my vegan rugelach recipe, shared here on October.
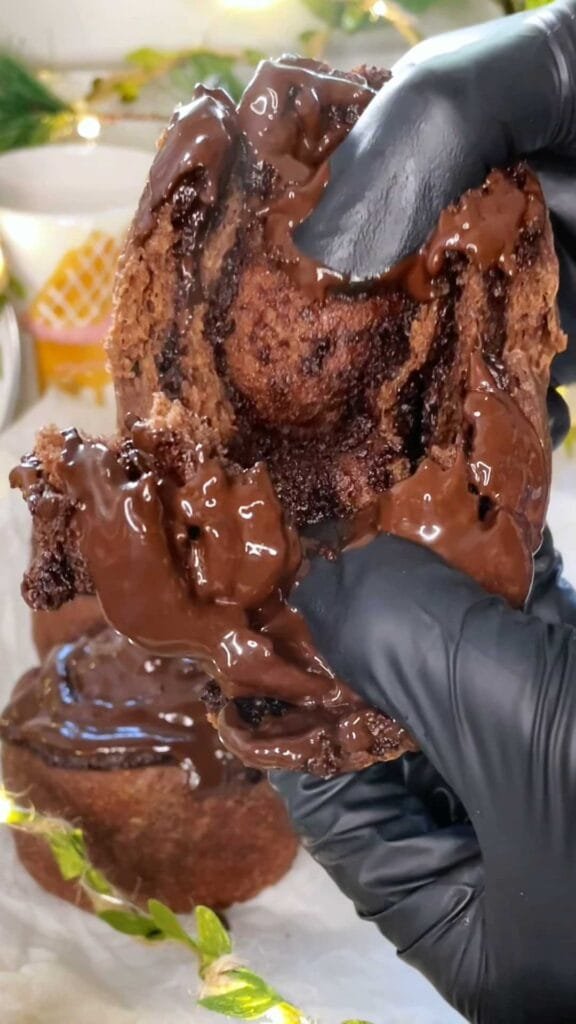
They are soft, pillowy and very chocolatey, and I cannot believe they are gluten free.
Instead of brushing them with simple syrup, I coated them with chocolate-hazelnuts glaze, and I sincerely ask you not to skip it, no matter what you do (!) This glaze takes this pastry to higher gluten free echelons, and you must give it a try – you’ll thank me later 😊
First published:
Last modified:
Gluten Free Double Chocolate Sweet Rolls:
Equipment:
Squared pan sized 20cm (l) x20cm (w) x 10cm (h), bottom and sides lined with parchment paper
Recipe: 9 Individual Pastries
Flour mixture (400g):
| Ingredient | Amount (g) |
| White Rice Flour | 100g |
| Tapioca Flour | 50g |
| Potato Starch | 50g |
| Brown Teff Flour | 80g |
| Millet Flour | 120g |
The Dough:
| Ingredient | Amount (g) |
| Flour Mixture | 400g |
| Psyllium Husk | 20g |
| Dry Yeasts | 10g |
| Xanthan Gum | 6g |
| Baking Powder | 10g |
| Salt | 6g |
| Dutch Processed Cocoa Powder | 20g |
| Cinnamon | 1/2 tsp |
| Water | 175g |
| Milk | 175g |
| Eggs | 100g (2 medium sized eggs) |
| Honey | 40g |
| White Granulated Sugar | 30g |
| Vanilla Sugar | 10g |
| Canola Oil | 60g |
Chocolate Filling
| Ingredient | Amount (g / units) |
| Dark Chocolate (55%) | 140g |
| Coconut Oil | 70g |
| Vanilla Sugar | 20g |
| White Granulated Sugar | 85g |
| Salt | 1/4 tsp |
| Espresso Powder | 1/4 tsp |
| Cinnamon | 1 tsp |
| Dutch Processed Cocoa Powder | 21g |
| Almond Flour | 42g |
| Vanilla Pudding Mix | 28g |
Chocolate-Hazelnuts Glaze:
| Ingredient | Amount (g / units) |
| Dark Chocolate (55%) | 40g |
| Coconut Oil | 20g |
| Unsweetened Hazelnuts Butter | 30g |
| Powdered Sugar | 30g |
| Salt | 1/8 tsp |
| Cinnamon | 1/4 tsp |
| Dutch Processed Cocoa Powder | 15g |
Preparation:
For the dough:
You could knead the dough using the machine or manually, however you prefer. I’ll describe both methods:
Machine mixing:
- Mix the psyllium husks with the honey, water milk and eggs. Set it to the side for a few minutes until a gel forms. The gel will be quite liquidish, and that’s ok.
- Into the bowl of a standing mixer, fitted with the paddle attachment, mix the rest of the flour mixture, xanthan gum, baking powder, yeasts, cocoa powder, cinnamon, salt, sugar and vanilla sugar.
- Add in the oil and psyllium gel.
- Mix on the lowest speed for 4 minutes. Note to stop the machine every minute and using a rubber spatula, scrape the paddle attachment, sides and bottom of the bowl to promote even mixing. The final dough should be a bit sticky to the touch and it needs to be refrigerated for 20 – 30 minutes.
Manual mixing:
Follow steps 1-3 above. The mixture can be mixed using a wooden spoon, but at some point, it will be inefficient. At this stage you should get in with your hands (please do not wear gloves for this task). Squeeze the dough between your fingers, and make sure there are no lumps of unmixed psyllium or flour visible. Occasionally, you could use a bench scraper or a rubber spatula to scrape off any dough sticking to your hand, to combine it with the rest of the dough in the bowl.
The final dough should be a bit sticky to the touch and it needs to be refrigerated for 20 – 30 minutes.
For the chocolate filling:
While the dough is resting, prepare the filling.
Microwave the chocolate and coconut oil together, add in the rest of the chocolate filling ingredients, and thoroughly mix them together. Refrigerate for about 50 minutes. Mix every 25 minutes. It’s important that the texture will be soft and creamy (spreadable) before it is used. To shorten times, you can put the filling in the freezer, but keep a close eye on the texture.
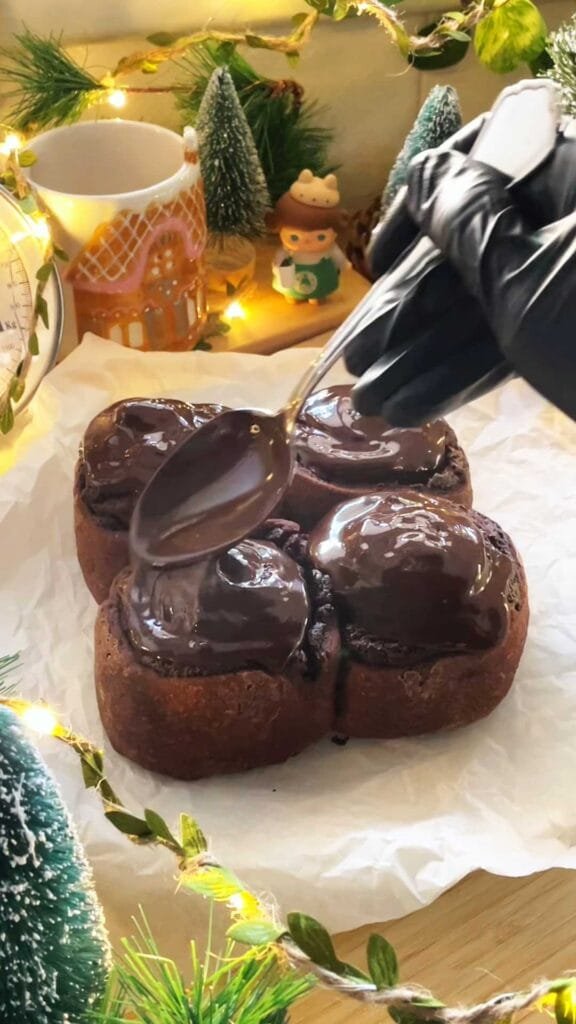
For the chocolate hazelnuts glaze:
The glaze can be prepared while the pastries are proving just before baking, and it needs to be slightly pasty in consistency, before spreading it on the baked pastries.
Microwave the chocolate and coconut, and mix to combine.
Add in the hazelnut butter and thoroughly mix it with the chocolate mixture.
Add in the rest of the ingredients, and mix really well until you get a smooth and lump-less mixture.
Assembly and baking:
- Transfer the dough onto a lightly floured counter, and dust it as well with some gluten free flour blend (anything you have at home).
- Roll the dough to a rectangle sized 35cm (w) x 40cm (l), with the longer edge facing closer to you.
- Evenly spread the filling all over the dough. Note that as it contains coconut oil, it is expected to set and harden in a very thin layer on top of the cold dough, and that’s ok. You may sprinkle some more chocolate chips on the dough at this stage if preferred.
- Using a pizza cutter, trim the right and left edges, so the length of the rectangle is now 36 cm.
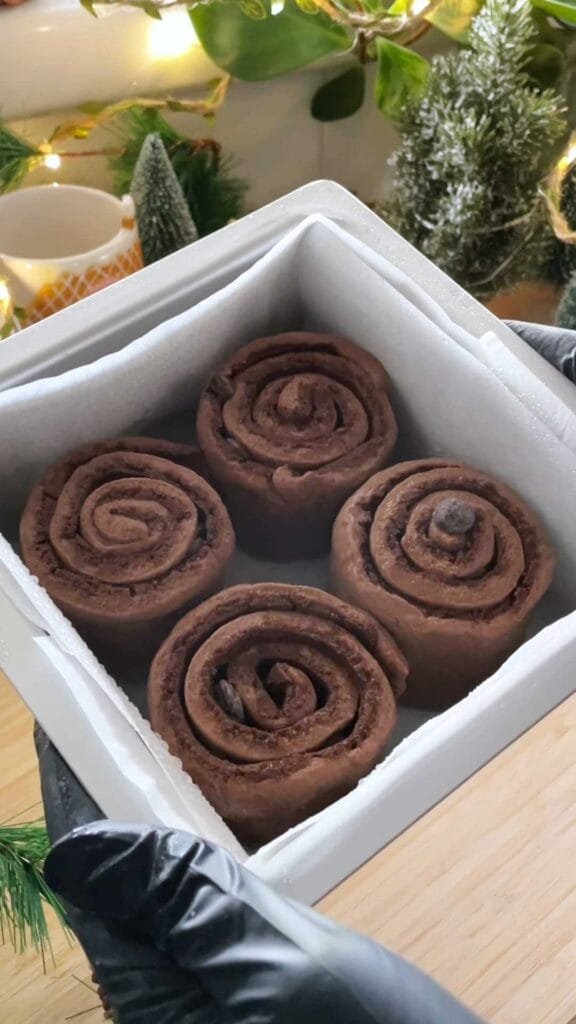
- Divide the dough to 4 cm strips – 9 in total.
- Roll each strip, and place in the prepared pan. I recommend brushing off any excess flour while rolling the pastries.
- Add moisture with a water spray bottle, cover tightly with plastic wrap, so that it directly touches the pastries, and proof for 1 hour in warm room temperature.
- Towards the end of proving time, pre-heat your oven to 180C, fan mode off, placing a baking rack at the lowest level inside the oven.
- Add moisture to the pasties using a water spray bottle, and cover the pan with another, same size pan, or cover it tightly using a piece of aluminum foil (see video demonstration), in order to maintain the steam during the first minutes of baking.
- Bake in the pre-heated oven for 15 minutes, covered. Then uncover the pan, and continue baking 20 more minutes. Note that you can loosely cover the pan again with foil after 10 more minutes in order to avoid over-browning.
- Once done, take the pan out to a cooling rack, allowing it to cool 10 minutes before unmolding the pastries directly to a cooling rack or a serving plate.
- Coat the pastries with the glaze, allow them to cool a few more minutes, and you can enjoy them fresh and warm.
Store inside an airtight container, up to 3 days. You can re-heat them in the microwave for 30-60 seconds (in pulses) to restore the soft texture.