Vegan Dubai Chocolate Deep Dish Dessert
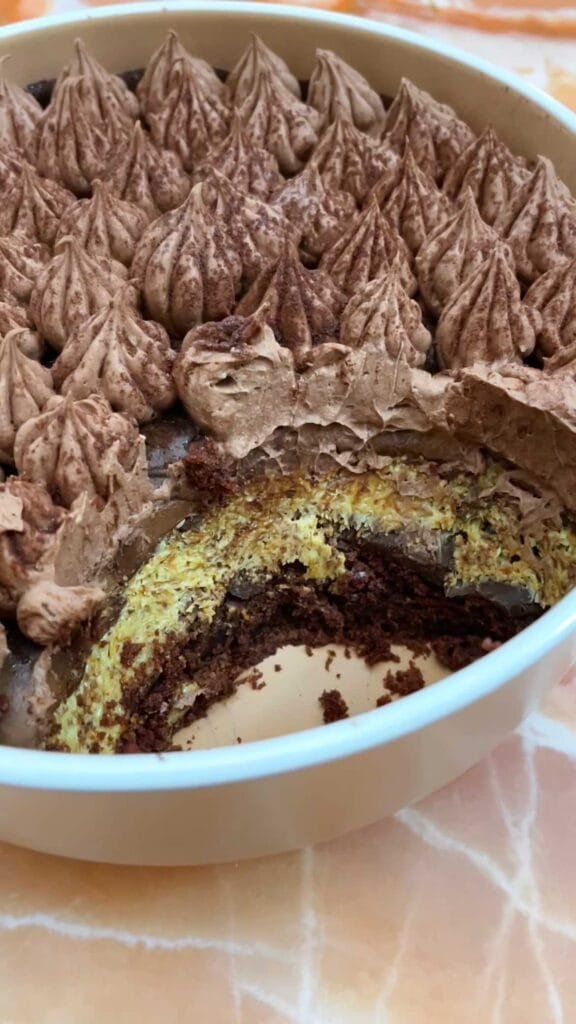
This recipe for Vegan Dubai Chocolate Deep Dish Dessert is composed of a chocolate cake layer, kataifi-pistachio filling, layered between two thin layers of dark chocolate, and topped with whipped cream.
Recently I’ve started experimenting with vegan baking quite a lot. It requires very strong control and knowledge in working with unique ingredients, which are less common in many pantries.
However, there are vegan recipes, such as this one, which do not require you to be a chemist, because all of the elements of this dessert are quite simple, and you can get a very fancy dairy free dessert which can easily be made vegan.
I’m listing the vegan recipe below, however, you could make just about any chocolate cake of your choice. Note that this cake turns out very soft and delicious, however it will feel slightly crumblier compared to non-vegan cakes, and cannot be used as a base for layered cakes. Instead of vegan whipping cream, you may of course use the dairy alternative.
First published:
Last modified:
Vegan Dubai Chocolate Deep Dish Dessert:
Equipment:
- For assembly: Deep Round Serving Dish sized 16cm (d) x 5.5 (h)
- For baking the cake: Round cake pan, 18cm (d) x 7cm (h), sides and bottom linked with parchment paper.
Recipe:
Cake Batter:
| Ingredient | Amount (g / units) |
| Apple Cider Vinegar | 5g |
| White Granulated Sugar | 105g |
| Vanilla Sugar | 10g |
| Vegetable Oil | 60g |
| Baking Powder | 8g |
| Water or Plant Based Milk | 130g |
| Boiling Water | 60g |
| Dutch Processed Cocoa Powder | 24g |
| All Purpose Flour | 165g |
For the Dubai Chocolate filling:
| Ingredient | Amount (g / units) |
| Dark Chocolate (55%), Melted | 120g |
| Kataifi | 90g |
| Pistachio Cream (Dairy or Vegan) * | 150g |
* You may substitute for 110g of unsweetened pistachio paste, mixed with 55g of powdered sugar.
Whipped Cream:
| Ingredient | Amount (g / units) |
| Vegan Whipping Cream | 200g |
| Dutch Processed Cocoa Powder | 13g |
Cake preparation and assembly instructions:
For the cake batter:
- Preheat your oven to 175C (fan mode off), setting a baking rack at the lowest level inside the oven.
- In a small bowl, mix together the boiling water with the cocoa powder and set to the side.
- In a large bowl, thoroughly whisk together the sugar, vanilla sugar, oil, apple cider vinegar and water or plant-based milk.
- Add the cocoa mixture to the rest of the wet ingredients, and thoroughly whisk to combine.
- Sift the dry ingredients over the chocolate mixture: flour and baking powder, and whisk just until there are no traces of visible flour.
- Pour the batter into the prepared baking pan, and bake for 25 minutes, or until a cake tester inserted into the center of the cake, comes out clean.
- Transfer the pan onto a cooling rack. Allow the cake to cool down completely inside the pan, before slicing it to 2cm thick layer (the diameter can be adjusted according to the serving dish size you have at home- I cut it into 15cm diameter).
For the Dubai Chocolate filling:
- Add the kataifi to a non-greased skillet- I recommend cutting it with scissors, for quicker roasting (I also recommend to not fry the kataifi in butter as I find it lends an unpleasant after-taste).
- Roast the kataifi over medium heat, stirring constantly with a wooden spoon, until golden brown. The kataifi will start breaking to smaller pieces during this process.
- Turn off the heat and transfer the kataifi to a clean bowl. Add in the pistachio cream and thoroughly mix together to combine. Set to the side until use.
Assembly:
- Place the cake layer inside the serving dish.
- Transfer the melted dark chocolate into a piping bag, and drizzle about 60g on top of the cake layer. Using an offset spatula, evenly spread the chocolate in as thin as possible layer, so it would be possible to cut through the dessert.
- Transfer the dish to the freezer for 10 minutes to allow the chocolate to set.
- Evenly spread all of the kataifi-pistachio filling on top of the chocolate layer. On top of it, drizzle another thin layer of about 60g of melted dark chocolate, using the offset spatula. Transfer to the freezer for additional 10 minutes.
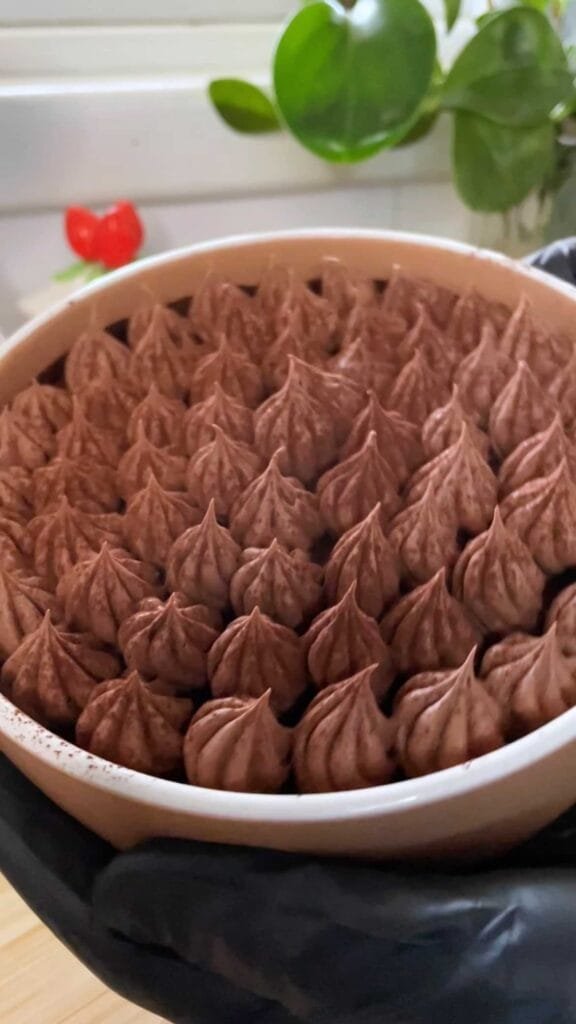
- Prepare the cream by whipping it with the cocoa powder (note whether your cream is already sweetened – if not, add sugar to taste). Transfer to a piping bag fitted with a nozzle of your choice (I’ve used piping nozzle number 108).
- Pipe the cream on top of the chocolate layer, and you may also dust it with some more cocoa powder.