Dobos Torte – Hungarian Layer Cake
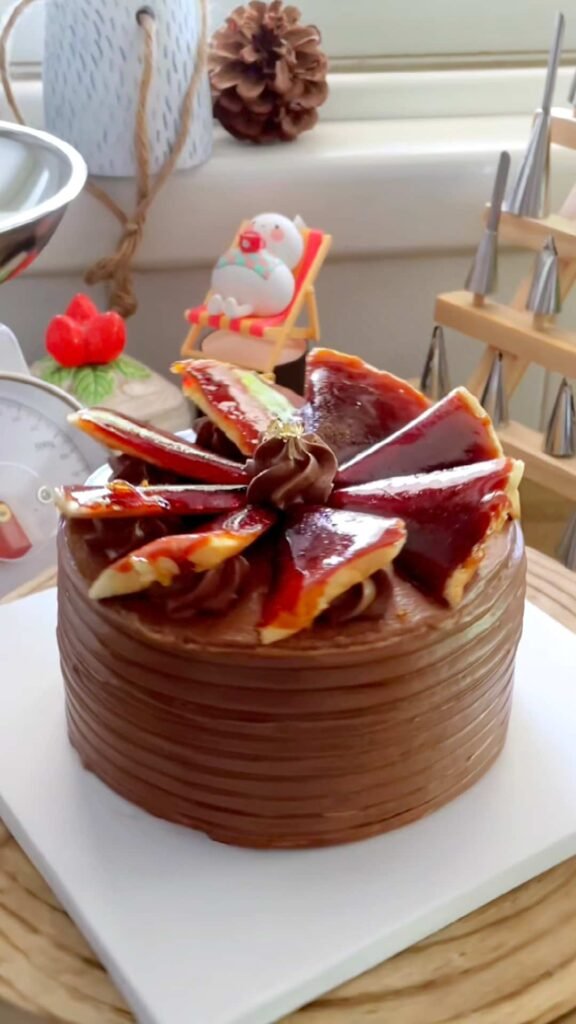
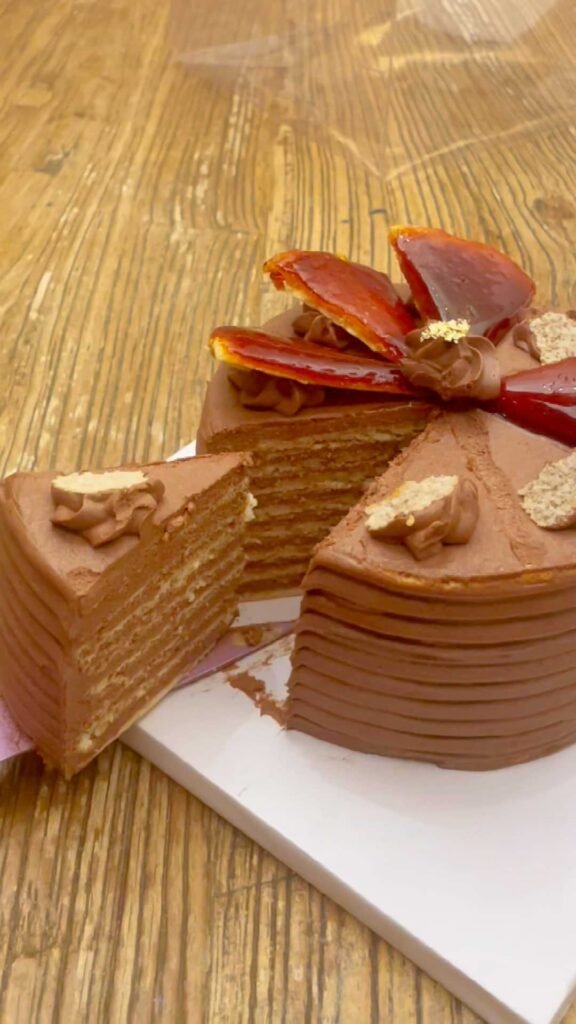
Dobos torte is a classic Hungarian layer cake, that is made of many thin cake layers and filled with rich chocolate cream.
It’s been a long while since I last made this cake, and I recalled its flavors only recently so I felt like whipping it up once more.
The cake batter is piped into rounds, in order for them to be very thin, somewhere between a pancake and a crepe thickness. The chocolate cream is made of my favorite German buttercream, flavored with dark chocolate and cocoa powder.
I admit the top decorating layer, glazed with the caramel, is the most challenging one to prepare, but definitely not impossible. You can skip it, however that is the main true mark of an authentic Dobos cake.
This cake can be finished within 2 hours if you’re quick, especially since the cake layers are so thin that they cool down very fast- which means the cake can be filled as soon as you’re done making the cream, and you don’t even have to crumb coat this cake.
You can totally prepare in advanced, and have the buttercream ready the day before (just ensure you make it in a microwave safe bowl, so it can be re-heated to soften the cream if needed). This cake is super fun to make, and even more satisfying to cut through all the layers, so I hope you make it and enjoy it.
16 September 2024 – Update: One of my followers had informed me that the recipe could easily be adjusted to a gluten free version, by substituting the cake flour for the same amount of white rice flour.
First published:
Last modified:
Dobos Torte – Hungarian Layer Cake:
Equipment: Baking sheets to bake the cake layers.
Recipe: A single cake, 15cm (d) x 9cm (h)
For the cake batter:
| Ingredient | Amount (g / units) |
| Egg Yolks | 111g (From 6 medium sized eggs) |
| Egg Whites | 180g (From 6 medium sized eggs) |
| Powdered Sugar | 95g |
| Salt | 1/4 tsp |
| Cake Flour (or same amount of White Rice Flour, for a gluten free version). | 85g |
For the Caramel Glaze:
| Ingredient | Amount (g / units) |
| White Granulated Sugar | 100g |
| Water | 40g |
For the Chocolate German Buttercream:
| Ingredient | Amount (g / units) |
| Eggs | 50g |
| Milk | 240g |
| Cornstarch | 18g |
| White Granulated Sugar (adjust sweetness level to your taste) | 50g |
| Vanilla Extract | 1 tbsp |
| Dutch Processed Cocoa Powder | 20g |
| Dark Chocolate (55-60%) | 100g |
| Softened Unsalted Butter (Room Temperature) | 180g |
Cake preparation:
For the Chocolate German Buttercream (demonstration for German buttercream is here):
- In a small bowl, whisk together 60g of the milk and cornstarch, until smooth and without any lumps. Add the eggs and whisk thoroughly to combine.
- Into a small saucepan, and the 180g of Milk with sugar and cocoa powder (I recommend to first mix the cocoa with the sugar, adding little bit of milk at a time and whisking to ensure a smooth texture and prevent any lumps). Cook on medium heat until the sugar is dissolved and the milk simmers.
- Gradually temper the eggs mixture with the hot milk by constantly whisking it to avoid cooking the eggs.
- Pour the eggs mixture back into the saucepan through a fine strainer to get rid of any unwanted cooked egg bits.
- Cook on medium heat whisking constantly making sure to scrape the sides of your pan, until you see large and thick bubbles rising to the surface. This should take 2-3 minutes. As soon as you see the bubbles, cook for some 1-2 more minutes.
- Remove from heat and add in the chocolate and vanilla. Whisk them well to combine.
- Transfer the batter to a clean bowl and cover it with plastic wrap that touches the surface of the custard to prevent a skin forming. Cool down to room temperature.
- Using an electric mixer, or using a standing mixer fitted with the paddle attachment, beat the unsalted butter on medium-high speed until it is light and fluffy.
- Add the cooled custard gradually by the tablespoon and mix very well to combine. There is no risk of separation here, but we need to ensure the cream is uniform.
Cake batter:
- Preheat your oven to 190C (fan mode off), setting a baking rack at the lowest level of your oven.
- In a bowl, using an electric handheld mixer or using a standing mixer fitted with the paddle attachment, start beating the egg whites on medium speed until a soapy foam starts to form. Gradually add in the powdered sugar and increase the mixing speed to medium-high.
- Keep beating until very stiff peaks are formed.
- Add in the yolks and fold them into the meringue.
- Sift the flour and salt on top of the meringue, and fold them gently until the powders are no longer visible.
- Transfer the batter to a large piping bag, fitted with a plain round piping tip 1A (14mm). I recommend to not transfer the entire batch, but do one part first, then re-fill your bag for the second round.
- Place the piping tip about 1/2cm higher above the parchment paper, and pipe rounds of cake batter, about 15cm in diameter. In the video demo I used a round template printed out of a word document. This way I fitted 3 rounds into a single flat baking sheet, standard size 40x30cm. However, you may pipe larger rounds or even rectangles, depending on you are shaping your cake.
The batter is enough to make 12 layers, 15cm (d), or 9 layers 18cm (d). The excess layers can be used as a backup in case something goes wrong.
- Bake in the pre-heated oven for 5 minutes. The cake should lightly golden. Let them cool for 2 minutes before gently peeling them off of the parchment paper. Note that if you wait too long, they will become sticky and harder to peel as they are very thin.
- Proceed in the same manner with the rest of the cake batter. Pile all layer together and set them to the side while making the caramel glaze.
For the caramel glaze:
Note that this step is optional and merely contributes to the authentic presentation of the cake.
- Choose the most aesthetic looking layer and invert it on top of a piece of aluminum foil.
- In a saucepan, mix sugar and water over low heat, until the sugar dissolves completely.
- Increase the heat to medium, and stop mixing. Allow the mixture to cook and bubble, until it changes color to a deep amber. If you have a thermometer, the temperature should reach 185C.
- Take the saucepan off the heat and wait for the bubbles to disappear and the caramel looks smooth.
- Pour the caramel on top of the cake layer, and using an oiled offset spatula, evenly spread it in one layer. There will be drippings overflowing the cake layer at some spots, but they can be cut using and oiled knight.
- Wait for 2-3 minutes and carefully transfer the glazed cake layer to another piece of parchment paper, while detaching it from the caramel drippings.
- Using an oiled sharp knight, make cutting marks that split the round into 8 equal pieces.
- Allow the caramel to harden 2 more minutes, and using an oiled knife, you can now cut into the pieces and they should snap. Set all pieces to the side until assembly.
Assembly:
- Place a cake layer, inverted, on top of a cake turning table, and evenly spread 50g of cream on top. Top the cream with another cake layer.
- Repeat the process with the rest of the cream and cake layers, The cake should have 8 cake layers and cream.
- Use the remaining cream to ice the top and sides of the cake.
- Transfer some cream to a piping bag (I used a no. 844, closed star piping nozzle), and pipe at symmetrical points around the cake).
- Lean the caramel glazed cake pieces on top of the piped decorations, and make another piping at the center.
- Store refrigerated, 4-5 days. Note that as we’re using buttercream, it is recommended to take the cake out 20 minutes before cutting and serving to allow it to reach room temperature.


