Gluten Free Chocolate Cake
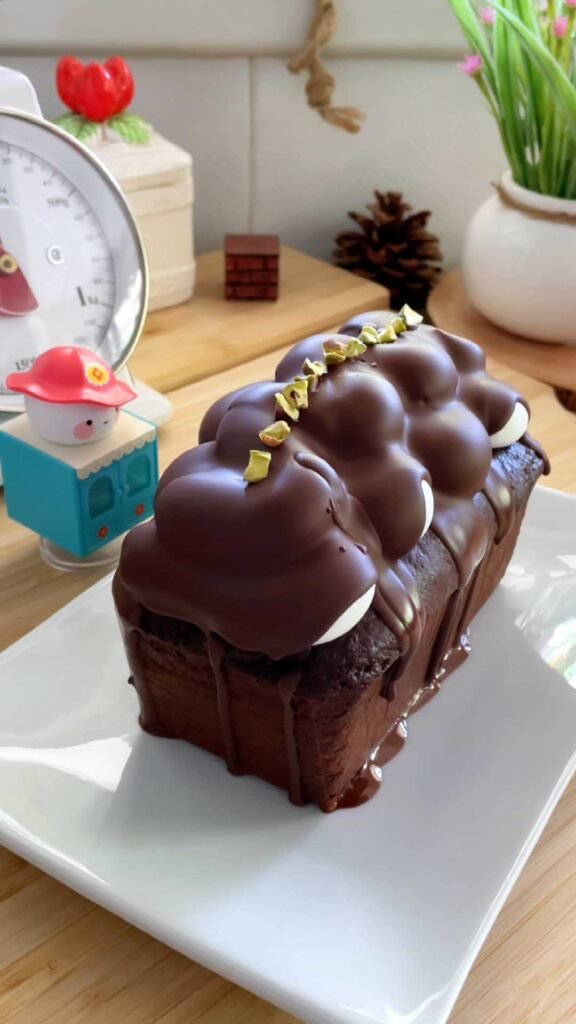
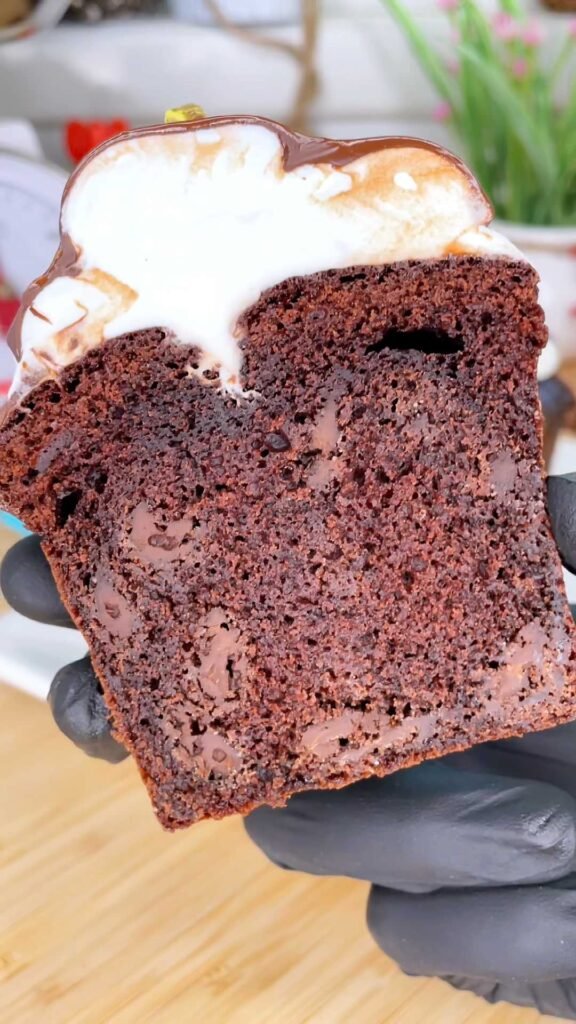
Gluten free chocolate cake, with chocolate chips for some extra crunchiness. Perfect for the chocolate cake lovers. I didn’t mention this on my video, but you can add even more moisture to this cake by poking some holes into the cake, and soak it with chocolate syrup or hot chocolate milk. In any case, it is very easy to prepare.
In case you’re interested in additional explanations regarding gluten free baking, please refer to the summarizing article, available here.
First published:
Last modified:
Gluten Free Chocolate Cake:
Equipment: Loaf pan sized: 15cm (l) x 5cm (h) x 8cm (w), lined with parchment paper
Recipe:
For the cake batter:
| Ingredient | Amount (g / units) |
| Unsalted Butter (melted) | 30g |
| Vegetable Oil | 15g |
| Brown Sugar (Sticky) | 42g |
| White Granulated Sugar | 42g |
| Salt | 1/8 tsp |
| Eggs | 67g |
| Sour Cream 15% | 24g |
| Milk | 65g |
| Vanilla Extract | 1 tsp |
| White Rice Flour | 43g |
| Potato Starch | 21g |
| Almond Meal | 21g |
| Baking Soda | 1/4 tsp |
| Baking Powder | 1/2 tsp |
| Dutch Processed Cocoa Powder | 20g |
| Espresso Powder | 1/4 tsp |
| Xanthan Gum | 1/8 + 1/16 tsps |
| Dark Chocolate Chips | 35g |
For the cream:
| Ingredient | Amount (g / units) |
| Heavy Cream (38%) | 70g |
| White Granulated Sugar | 7g |
For the chocolate coating:
| Ingredient | Amount (g / units) |
| Dark Chocolate (55-60%) | 60g |
| Coconut Oil | 10g |
Cake preparation:
For the cake batter:
- Pre-heat your oven to 170C, fan mode off, placing a baking rack at the lowest level inside the oven.
- Into a large mixing bowl, add the melted butter, oil, sugar, salt and vanilla extract.
- Sift the dry ingredients over the dry ingredients: Rice flour, potato starch, almond meal, baking powder, baking soda, cocoa and espresso powders, and xanthan gum.
- Using a spatula, mix the ingredients together to coat the flours with the fats, until the mixture becomes dry and crumbly, that almost reminiscent of a cookie dough. Do not be tempted to use a whisk at this stage as it will not mix effectively. Make sure you thoroughly mix the ingredients together, that there are no pockets of flours, lumps, or dark spots.
- Add in the eggs and milk. Start mixing using the spatula to slightly loosen the mixture. Then, using a hand whisk, mix the batter thoroughly to get rid of all lumps and the batter becomes fully smooth. There is no need to be concerned about over mixing.
- Add the sour cream and mix it will into the batter using the whisk until smooth. Add the chocolate chips and mix to combine.
- Transfer the batter to the prepared baking pan, and bake in the pre-heated oven for 35 minutes, or until a cake tester inserted into the center of the cake, comes out clean.
Note: After about 7 minutes of baking, you may take the cake out of the oven to cut a slit, using a sharp serrated knife, lengthwise the center of the cake, in order for it to dome nicely in the center. Then, return the cake back to the oven for the remaining baking time. - Allow the cake to cool down in the pan, over a cooling rack, for 15 minutes before unmolding.
For the cream:
In a medium sized bowl, beat the heavy cream with the sugar to stiff consistency that is suitable for piping.
Transfer to a piping bag fitted with a round piping nozzle, 16mm in diameter.
For the chocolate coating:
In a small bowl, melt the chocolate in the microwave and mix it until it is smooth. Add in the coconut oil and mix it well into the chocolate until uniform, and there no oily streaks can be seen. Use when the mixture reaches around body temperature (34C, if using a candy thermometer).
Assembly instructions:
- Pipe decorations on top of the cake.
- If interested in using the chocolate coating, the piped cream needs to be frozen, therefore, put the cake in the freezer for about 30 minutes until the cream is set.
- When the chocolate coating reaches the working temperature, pour it over the frozen cream and it should solidify within a few seconds, changing from glossy to matte.
- Store refrigerated (if using the cream) and serve at room temperature.