Gluten Free Pancakes
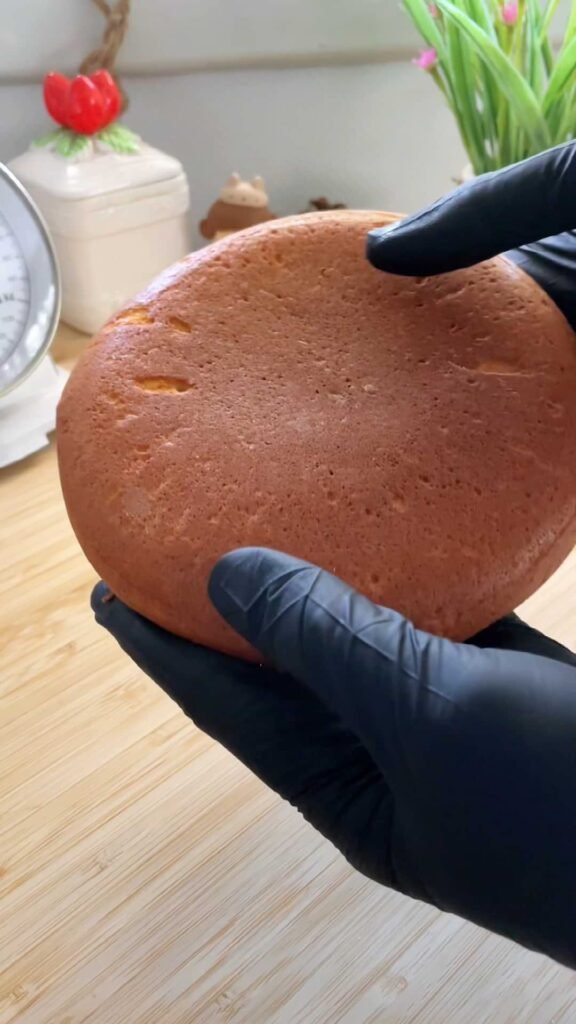
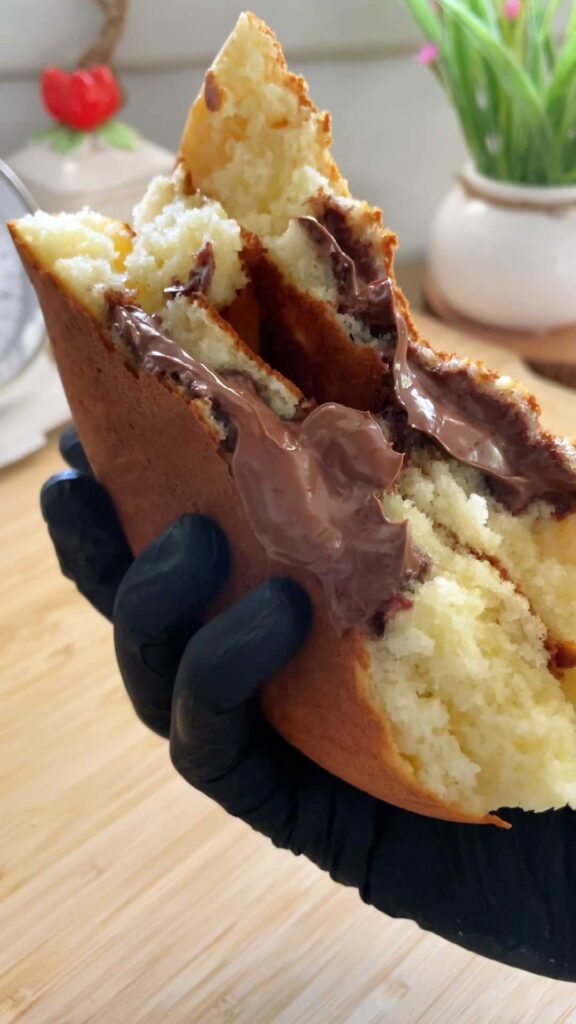
This is my version for gluten free pancakes, without even feeling any difference. The pancakes turns out fat, fluffy and airy, and I even cooked it with some Nutella inside it. It was a dream, let me tell you. I’ve added explanations and all my previously provided tips for the perfect pancakes, to this recipe as well.
In the video, I’ve demonstrated the differences between using a combination of potato starch and cornstarch, versus using white rice flour. It’s amazing how a single ingredient can make such a big difference. However, this was expected, as rice flour contains not only starches, but protein as well, which stabilizes the structure of the pastry.
First published:
Last modified:
Gluten Free Pancakes:
Cooking Pan, 16cm (d), with a lid.
Recipe: 4 Very large pancakes
| Ingredient | Amount (g / units) |
| White Rice Flour | 140g |
| Baking Powder | 6g (1 + 1/4 tsps) |
| Sugar | 30g |
| Vanilla Sugar | 10g |
| Salt | 1/8 tsp |
| Eggs | 50g (1 Medium sized egg) |
| Melted Butter | 20g |
| Milk | 120g |
Preparation instructions:
- Melt the butter in the microwave.
- Into a medium sized bowl, add the sugar, salt, milk, vanilla and eggs. Whisk thoroughly to combine.
- Sift the dry ingredients over the wet ingredients: rice flour and baking powder. Whisk thoroughly to a smooth butter without any lumps.
- Grease a 16cm (d) pan with some butter and let is heat on the lowest heat on your stovetop. Once the butter is melted, using a paper towel, wipe it evenly all over the pan, making sure there is a very thin butter layer coating the pan (bottom and sides). This is key in order to get perfectly browned pancakes. Make sure the pan is hot enough before cooking your first pancake (you can fill it with your hand hovering above the pan).
- Pour a quarter of the pancake mixture (about 90g) into the greased pan, making sure it covers the entire pan surface. Let it cook on the lowest heat, COVERED with the lid. It should take about 4.5 minutes for the bottom side to cook, but every stovetop cooks differently, so please time yours.
- The top part should be quite stable, and there shouldn’t be many bubbles on top as we’re used to seeing from wheat flour pancakes. Using a spatula, examine the sides of the pancakes and check to see whether there is still some raw batter that is too liquid, that is trying to flow to the edge of the pan. If the sides are pretty solid and most of the center part of the pancake looks jiggly, turn oven your pancake.
- COVER the pan with the lid and keep cooking for about 3 more minutes.
Serve with any toppings of your choice and enjoy!
NOTE: The first pancake will always look ugly. It’s like a fourth law of the universe. However, the second pancake onwards should turn out perfectly browned. There is also no need to further grease the pan between each pancake. If it still looks like the pan could use some greasing, use the paper towel you initially used to wipe most of the excess butter before you started cooking.
Only if you’re brave (lol):
- If you’d like to add Nutella into the pancakes, freeze in advanced relatively flat chunks of Nutella, 50g each (diameter is about 6.5 – 7 cm).
- DO NOT add the Nutella chunk into the first pancake that you cook. It always turns out bad, as I mentioned above. Pour 100g of batter into the pan, gently place the Nutella on top, and cover with additional 50g of batter.
- The cooking instructions are similar to the above, but cooking time is prolonged. Cooking the first side takes about 7 minutes (with the lid on). The top part of the pancake will be slightly jiggly, and the Nutella will be slightly visible, which is ok. Turn the pancake in one swift motion, cover the pan and cook for another 4 minutes, to have a Nutella pancake of your dreams.