Homemade Puff Pastry Cheese Burekas
I made this recipe for homemade Puff Pastry Cheese Burekas for the upcoming Shavuot. If you never had the chance to make puff pastry dough at home, you’ve got to at least give this version a try, as it is quick and doesn’t require folding a butter block into the dough. I’ve also made a gluten free version of this burekas, here.
Instead, you incorporate the butter directly into the flour, and perform a series of simple folds, one after the other, called “letter fold”, or “3-fold”.
As to the filling- that’s a standard cheese filling, but you’re welcome to use any filling of your choice for filling this burekas. Although the result of pastries made with quick puff pastry such as this, is of high quality- the classic and original method of folding a butter block into the dough, gives a much more accurate result, with more uniform lamination. And despite all of the above, I’d still prefer to use this version for most cases.
First published:
Last modified:
Homemade Puff Pastry Cheese Burekas:
Equipment: No special equipment is needed.
Recipe: Makes 8 Medium sized burekas
Home-made puff pastry dough:
| Ingredient | Amount (g / units) |
| All Purpose Flour | 250g |
| Salt | 1/2 tsp |
| Cold, Cubed Unsalted Butter | 150g |
| Cold Water | 90g |
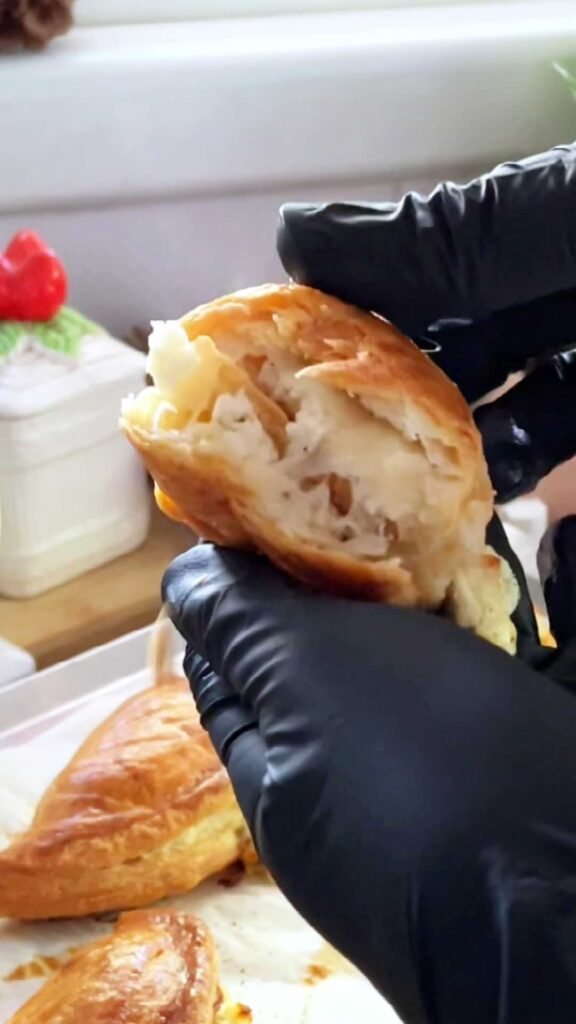
Cheese Filling:
| Ingredient | Amount (g / units) |
| White Cheese (3%) | 100g |
| Sirene Cheese (5%) | 50g |
| Shredded Mozzarella (24%) | 50g |
| Eggs | 50g (1 Medium Sized Egg) |
| Salt | 1/4 tsp (or to taste) |
| Pepper | 1/4 tsp (or to taste) |
| Fresh Basil, finely chopped | 4 Leaves (optional) |
Egg Wash:
One beaten egg, with little bit of water and a little bit of salt.
Preparation instructions:
For the dough:
Note: When making puff pastry at home, it is highly recommended to work in a cold environment. It is less of a problem during winter, but on summer days you may want to turn on you’re A/C, otherwise the butter will start melting really quickly, which would require refrigerating the dough between the folding.
- In a large mixing bowl, mix together the flour and salt.
- Add in the butter, and using your fingertips, incorporate it into the flour (see video demonstration). The goal is to flatten the butter between the fingers, and coat it with the flour, until it shrinks to medium sized pieces. You can also use both hands to run the butter in the flour, but watch not to overheat the butter too much due to the heat of the hands, otherwise the butter would melt.
- Add in the entire amount of water, and mix it in until just roughly combined. The dough will not be smooth and that’s is normal and to be expected.
- Drop the dough to your counter and lightly combine it with your hands. Roll it as much as possible, to a rectangle. The size doesn’t matter, and at first it may seem like it’s not gonna get there, but the more folds you do, the smoother the dough becomes.
- Make the first fold by bringing the lower third of the dough towards the center, and fold the top third of the dough on top of it (see video demonstration).
- Using a bench scraper, clean your counter from leftover dough and butter that have sticked to it, and dust it with little bit of flour.
- Rotate the dough 90 degrees clockwise, and roll it again to a rectangle.
- Repeat steps 5 through 7, three more times- Four letter folds in total should be made. Note that it’s important to clean your counter to prevent the dough from sticking to it, as the butter melts while you are working.
It is also important to use as little flour as possible when dusting your counter, dough and rolling pin- too much flour would not lead to the desired result. - After all folds were made, wrap the dough with plastic wrap, and refrigerate it for 30 minutes, to allow the dough to rest and to set the butter. Meanwhile, prepare the filling.
Cheese filling:
- Into a medium sized bowl, add all the ingredients for the filling and thoroughly mix them together.
- The filling will be more fluid than what you see in the video demonstration, since as I was fine-tuning the recipe, I decided to add an egg which would help to keep the filling inside the pastry. Keep refrigerated until use.
Assembly and baking:
- Take the dough out of the refrigerator, and divide it into two equally sized parts. You could also work with a single, non-divided dough, but I find working on each part separately is more convenient. Keep the other part covered with plastic wrap, in the refrigerator, while you are working on the first part.
- Over a lightly floured counter, start rolling the dough. Note that if the dough is too cold, it will not roll easily. It will crack and break. Therefore, it is recommended to wait a few minutes, or hit the dough with a rolling pin to soften it.
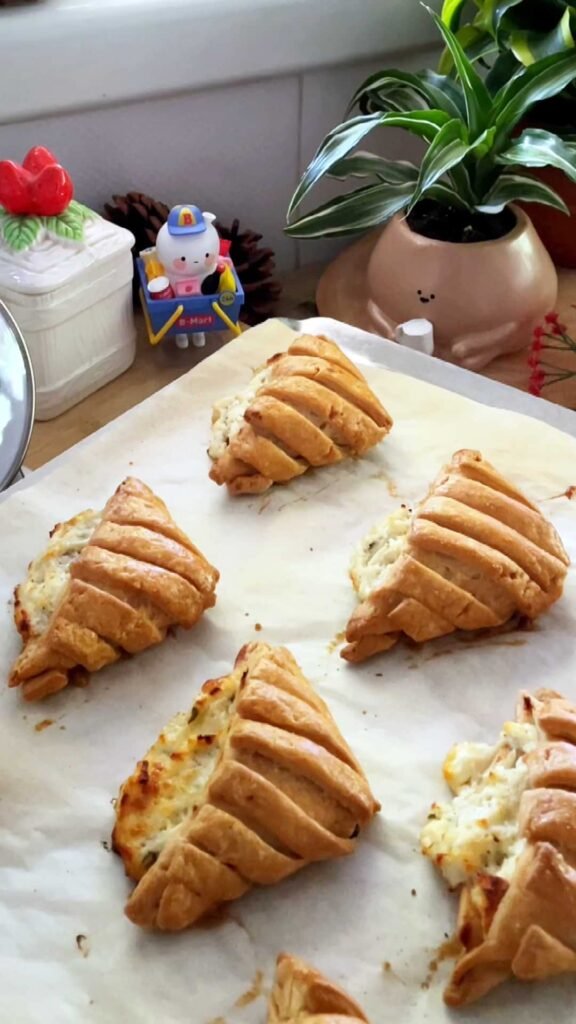
- Roll the dough to a square sized 25cm (l) x 25cm (w). Trim the edges for a perfectly straight square sized 24cm (l) x 24cm (w). From this point, there are two ways to shape your burekas:
Triangle shape: Divide the dough in the center of each side of the square, to make 4 dough squares, each sized 12cm (l) x 12cm (w).
At the bottom half of each dough square, cut strips using a bench scraper.
Using a little dab of water, moist the top part of the dough and fold it over the strips, so they stick together.
At the center of the resulting rectangle, place about 26g of the cheese filling.
Bring the two top corners together towards the center, and close the dough on the filling.
Invert the pastry and place on a baking sheet lined with parchment paper. Repeat the same process for the rest of the pastries.
For shaping a half round: Using a size 12cm (d) baking ring, cut 4 dough circles.
Using a little dab of water, moist the perimeter of each circle, so the edges can stick together.
At the center of each circle, place about 26g of the cheese filling.
Close the dough on the filling, and lightly press the edges together with your fingers to seal the pastry.
Place on a baking sheet lined with parchment paper. Repeat the same process for the rest of the pastries.
- Refrigerate the pastries while the oven is pre-heating.
- Turn on your oven to 200C (fan mode off), with a baking rack placed at the middle shelf inside the oven.
- Take the pastries out of the refrigerator, and brush them with the egg wash. You may also add a little design on the top crust, using the back of a sharp knife, or sprinkle them with some sesame seeds.
- Bake for 25 minutes until the pastries have fully browned.
- Let the pastries cool down over a cooling rack, and wait about 15 minutes before serving.
Store at room temperature, inside an airtight container, 2-3 days. You can reheat these in the oven for about 5 minutes, 180C.