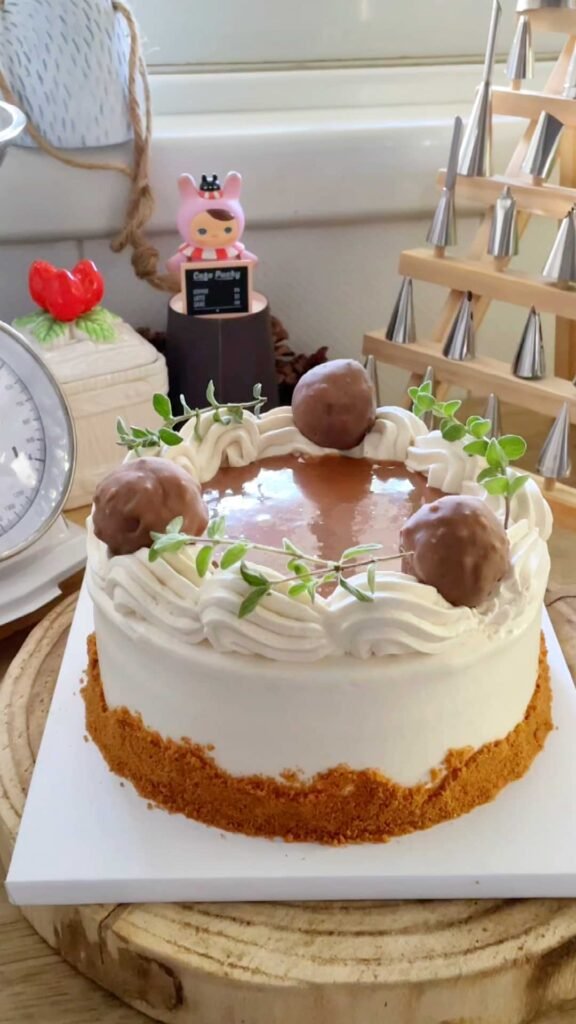
Salted Caramel Layer Cake
Salted caramel layer cake. Salted caramel is one of the most common elements in many desserts that we all know and love. There are three different types of caramel, but my most favorite (and also the most useful in my opinion), is the wet caramel. Usually when I am making salted caramel, I made a large batch because I end up using it too quickly (have you ever tried adding it to a hot chocolate? You don’t know what you’re missing on if you haven’t lol). It sets upon refrigeration, however, a few seconds in the microwave will restore its gorgeous liquid consistency.
This time I’ve chosen to combine it each one of this cake’s elements. It is easy to make, but important to have all of your equipment ready in advanced, because once the sugar reached the caramelization temperature, everything happens very fast. Please use real and high-quality vanilla only, as it doesn’t compare to anything else. This cake is slightly complicated, but totally worth your while, and many of the elements can be prepared in advance and refrigerated.
First published:
Last modified:
Salted Caramel Layer Cake:
Recipe:
| Element | Ingredient | Amount (g / units) |
| Vanilla Genoise (Recipe) | – | 1.5cm thick x 3 Sheets |
| Salted Caramel (about 420g total) | White Granulated Sugar | 220g |
| Water | 120g | |
| Heavy Cream (38%) | 242g | |
| Vanilla Paste or Extract | 12g | |
| Sea Salt | 1 tsp | |
| Decoration: Salted Caramel Truffles (14 pieces) | Vanilla Cake Crumbs (or Graham Cracker Crumbs) | 100g |
| Nuts, medium chopped (of your choice) | 40g | |
| Dutch Processed Cocoa Powder | 10g | |
| Hazelnut Butter | 35g | |
| Salted Caramel | 35g | |
| Chocolate Coating for the Truffles | Milk Chocolate | 50g |
| White Chocolate | 50g | |
| Vegetable Oil | 14g | |
| Nuts, medium chopped (of your choice) | 20g | |
| Decoration: Salted Caramel Pool | Salted Caramel | 40g |
| Heavy Cream (38%) | 20g | |
| Decoration: Biscoff Cookie Crumbs | Biscoff Cookie Crumbs | 50g |
| Salted Caramel Whipped Cream | Heavy Cream (38%) | 390g |
| Salted Caramel | 70g | |
| Instant Vanilla Pudding Mix | 20g |
Preparation:
- Into a medium sized saucepan, over medium heat, cook the sugar and water together, constantly stirring, until the sugar dissolves completely.
- Once the sugar is dissolved, stop stirring and wait until the sugar caramelize. It should take about 10-15 minutes, until it starts changing color. In any case, do not stir or mix this sugar syrup at any stage.
- In parallel, heat the cream to a temperature of about 60C (it’s ok to heat it in the microwave). You can check for steam coming up of the cream, even if you’re not using a candy thermometer. Add in the vanilla and mix it into the cream.
- As soon as the sugar syrup’s reaches a deep amber color (around 175-185C), take the saucepan off the heat.
- Slowly and gradually add the hot cream (note that the cream must be hot, otherwise the caramel will crystallize). Mix with a heat resistant spatula, or a wooden spoon, with each addition of cream. Do not bring your face close to the saucepan because the steam rising from the caramel are extremely hot.
- Once all the cream was added, stir in the salt, and return to the stove, cooking on low heat, stirring constantly to ensure any hardened caramel residues at the bottom of the saucepan, are fully dissolved.
- Take the saucepan off the heat, and allow the caramel to cool down at least to room temperature, before you transfer it to a sterile and sealed jar, so it can be stored in the refrigerator.
- The caramel can be stored for weeks and even months refrigerated- according to the expiration date of the heavy cream you used.
For the salted caramel cream:
This specific cream is made a little bit differently, since the caramel makes the cream behave differently than usual, and it becomes less stable during whipping. This is the only reason why I am also adding the instant vanilla pudding mix powder for extra stabilization (something which I don’t normally do, and don’t love to do when making whipped cream layer cakes). Before whipping the cream, you take out the needed amount and whip it separately. Please review the instructions carefully before you prepare this cream.
- Into a large bowl, add the heavy cream, salted caramel and vanilla pudding mix.
- Using an immersion blender, unify the ingredients together. If you don’t own an immersion blender, mix the salted caramel with the pudding mix together only. Then gradually add the heavy cream, stirring constantly, to ensure the caramel and pudding mix are incorporated well.
- Cover the bowl with a piece of plastic wrap and refrigerate for 30 minutes. Then transfer the bowl to the freezer for 40 minutes. If you take longer to prepare this cake, after 40 minutes in the freezer, return the bowl back to the refrigerator, and keep it there until use.
For the Salted Caramel Truffles:
- Into a food processor, add all of the truffles’ ingredients, and pulse together until the mixture is uniform, and comes together when pinched between your fingers.
- Roll small balls, 15g each, and keep in the freezer while making the chocolate coating.
- For the chocolate coating: In a bowl, melt the milk chocolate and white chocolate in the microwave, and mix until combined. Add in the oil and chopped nuts and mix them together. The coating’s temperature should be about 34C (slightly lower than the body temperature).
- Dip the calls in the chocolate coating, and ensure they are coated from all sides. Using two forks (or a chocolate fork), transfer the coated balls over to a small tray lined with parchment paper, and carefully place them. Keep in the freezer until use.
Cake assembly instructions:
- Insert Cream: Take out the of the salted caramel cream batch, 180g into a separate bowl. Using a handheld electric mixer, whip the cream to very stiff speaks.
- Spread 75g insert cream, and cover it with another cake sheet.
- Keep stacking all the sheets in similar manner. Use the remaining insert cream to crumb coat the entire cake.
- Icing Cream: Take out the of the salted caramel cream batch, 120g into a separate bowl. Using a handheld electric mixer, whip the cream to very stable peaks, and ice the entire cake.
- Freeze the cake for 10 minutes to set, then adhere the Biscoff crumbs to the lowest part of the cake (see video demonstration).
- Piping Cream: The rest of the cream in the bowl, should be whipped to a pipeable consistency. Transfer it to a piping bag fitted with a large open start piping tip no. 828, and pipe a border around the edge of the cake.
- Caramel pool- microwave the salted caramel and heavy cream together for a few seconds, and mix together until combined. Pour this mixture to the center of the cake.
- Decorate with the salted caramel truffles, or as per your personal preference.