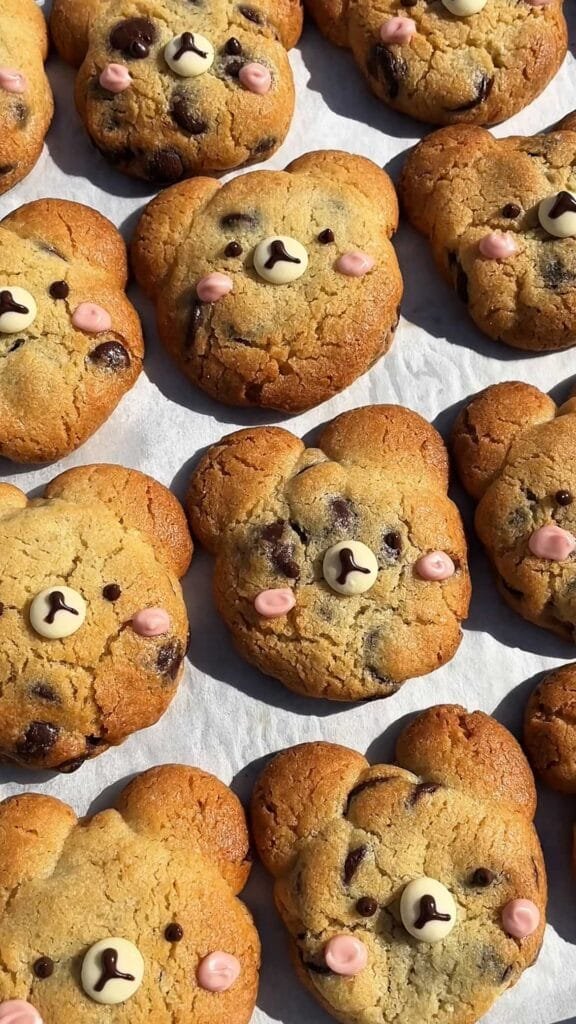
Teddie Bear Chocolate Chip Cookies
Teddie bear chocolate chip cookies- super cute, which will be loved by any kid (and adult lol). Do not be alarmed by the insanely high amount of sugar in this recipe. As far as cookies go, the ratio of sugar to flour in a recipe, highly impacts the texture and how they behave during baking. It helps expect a certain behavior of the pastry, especially when aiming to shape a cookie in a certain way.
In addition, similarly to sweetened yeasted dough- when combining different types of flours in cookies, it could also impact the final texture. Here I’m using both bread flour, with a slightly higher ratio of cake flour, to make the cookies feel cakier. Generally speaking, I always ensure to have 3 types of flours in my pantry: all purpose, cake and bread flours. If you bake a lot, I’d recommend you to do the same.
Throughout this recipe you will see that there’s a lot of refrigeration stages, when the most important one is the one before baking, which helps prevent the cookies from over-expansion in the oven.
The last pointer for this recipe, would be to be as precise as possible when weighing out your cookies, as well as shaping them as symmetrical as possible. This would help with even baking and similar final size.
First published:
Last modified:
Teddie Bear Chocolate Chip Cookies:
Equipment: No special equipment required.
Recipe: 12 Large cookies, or 24 smaller cookies.
For the dough (about 900g)
| Ingredient | Amount (g / units) |
| Softened Unsalted Butter (Room Temperature) | 150g |
| Brown Sugar (Demerara) | 125g |
| White Granulated Sugar | 110g |
| Salt | 5g |
| Eggs | 50g (1 Medium sized egg) |
| Baking Powder | 1/2 tsp |
| Baking Soda | 1/4 tsp |
| Bread Flour | 120g |
| Cake Flour | 135g |
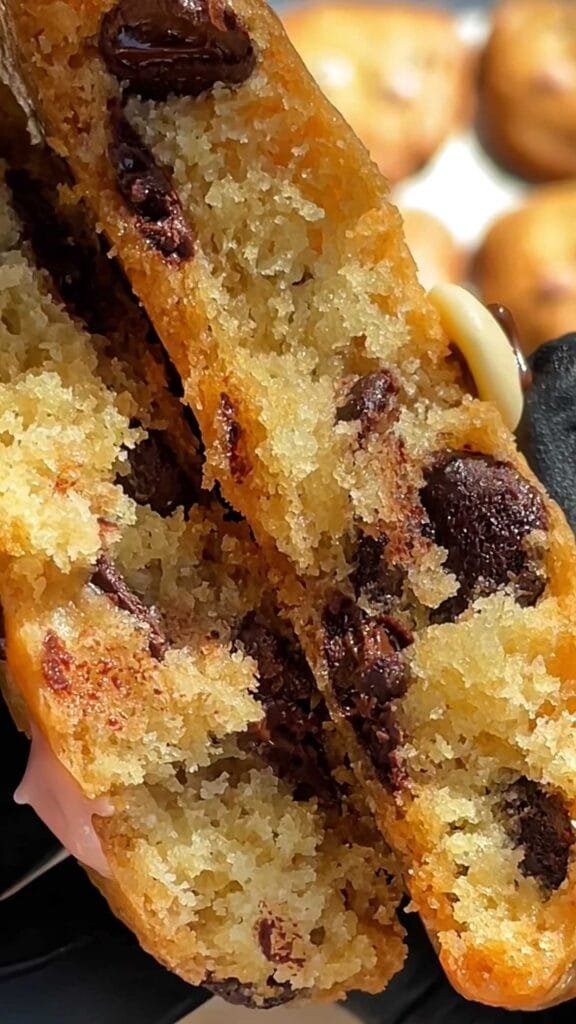
| Dark Chocolate Chips (55-70%), or Milk Chocolate, or White Chocolate, or a combination – any of your choice. | 204g |
For decoration:
| Ingredient | Amount (g / units) |
| For the eyes and nose details | Some melted dark chocolate |
| For the noses | White chocolate chips |
| For the cheeks | Some melted strawberry chocolate |
Preparation instructions:
It is recommended to use a standing mixer to make the cookie dough.
- In a standing mixer bowl, fitted with the paddle attachment, cream together the butter, sugars and salt, over medium speed for 2 minutes. Occasionally scrape the sides and bottom of the bowl with a spatula to promote even mixing.
The mixture should be rather smooth and creamy.
- Add in the eggs, and mix on medium speed for 2 minutes, scraping the mixture occasionally, similarly to the step 1.
- Add in the dry ingredients: flours, baking powder and baking soda, and mix on low speed, gradually increasing to medium, just until the dough is uniform and smooth. It will be quite sticky.
- Take out some of the dough into a separate bowl, which will be used to shape the ears- cover and refrigerate for 20-30 minutes:
- For large cookies- 144g
- For small cookies- 180g
- Add the chocolate chips into the mixing bowl, and mix for just a few seconds to evenly distribute them across the dough. Transfer to a separate bowl, cover and chill for 20-30 minutes.
- To shape the ears:
- For large cookies- shape 24 dough balls, 6g each.
- For small cookies- shape 49 dough balls, 3.75g each.
Arrange the dough balls on a tray and refrigerate until assembly, at least 20 minutes.
- To shape the face:
- For large cookies- shape 12 dough balls, 62g each.
- For small cookies- shape 24 dough balls, 30g each.
Arrange the dough balls on a tray and refrigerate until assembly, at least 20 minutes.
- Using the palm of your hand, press each of the face dough balls, to the following diameter and thickness:
- For large cookies – 6 cm (d) x 2.5 cm (h)
- For small cookies – 4 cm (d) x 2 cm (h)
You may use a ruler to shape the first cookies, then eyeball the rest of the cookies size. It is also recommended to keep the side with less chocolate chips facing upwards, to make the face details more visible.
- Using your fingers, make two indentations where the ears should go (1 and 11 o’clock, or 2 and 10 o’clock), and attach the ears into place.
- Arrange the shaped cookies on a baking sheet lined with parchment paper, evenly spacing them apart as they expand a lot during baking (up to 6 large cookies or 8 small cookies in one tray). Keep the cookies refrigerated for 20 minutes while the oven is pre-heating.
- Bake at 180C, fan mode off, until nicely golden brown, in the following manner:
- Large cookies- 18 minutes, with the baking rack placed at the bottom shelf inside the oven.
- Small cookies- 10-11 minutes, with the baking rack placed at the middle shelf inside the oven.
- If needed, you may use 2 teaspoons to gently skew the cookies as soon as they’re out of the oven, while they’re still soft to the touch.
- Allow the cookies to cool down completely before adding the rest of the face details, as shown in the photos or video.
- Store in a cool to ambient room temperature in an airtight container, between 1-2 weeks, or up to 1 month refrigerated (it is recommended to bring the cookies to room temperature before serving).