Gluten Free Rugelach
Gluten free rugelach recipe, made from home-made gluten free yeasted dough, that is composed of original flour blend. After dozens of experimenting going with these rugelach, I feel confident enough to share my recipe of these guys, because I personally think they turned out really great, and this recipe might end up being very useful to anyone who seeks to explore something new.
I’d like to add a few pointers regarding this recipe:
- I highly recommend to read all the explanations provided here. The page also includes images showing how the dough was made. The explanations will help you to get a general understanding of why things work (or don’t) when making gluten free yeasted dough at home.
- All of the below instructions, are referring only to my own recipe. I haven’t tried it with storebought gluten free flour blends, therefore unfortunately I would not be able to address questions regarding substitutions with those other flour blends.
- I highly recommend to first try the recipe as it is before making any changes, especially changes to the flours.
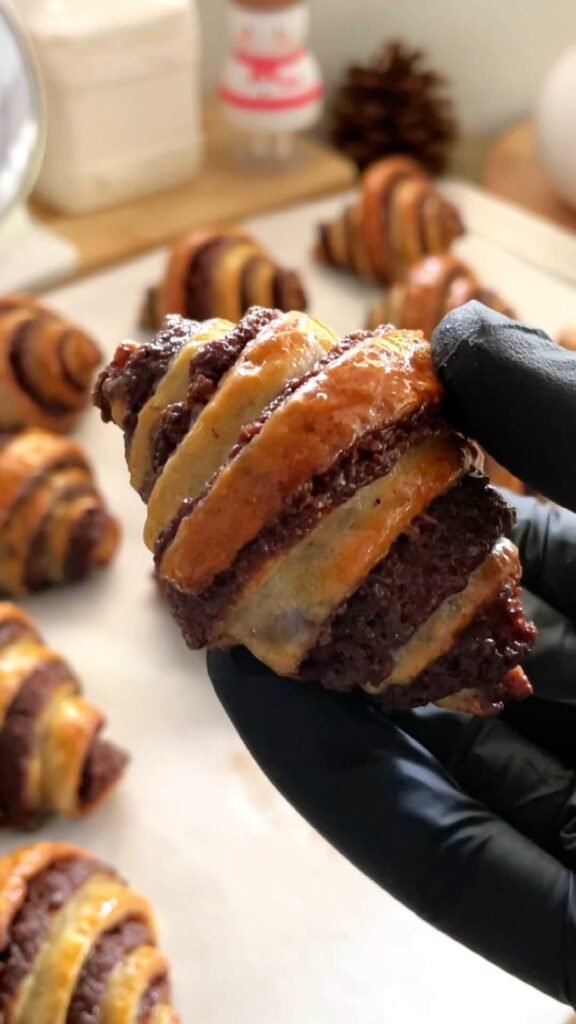
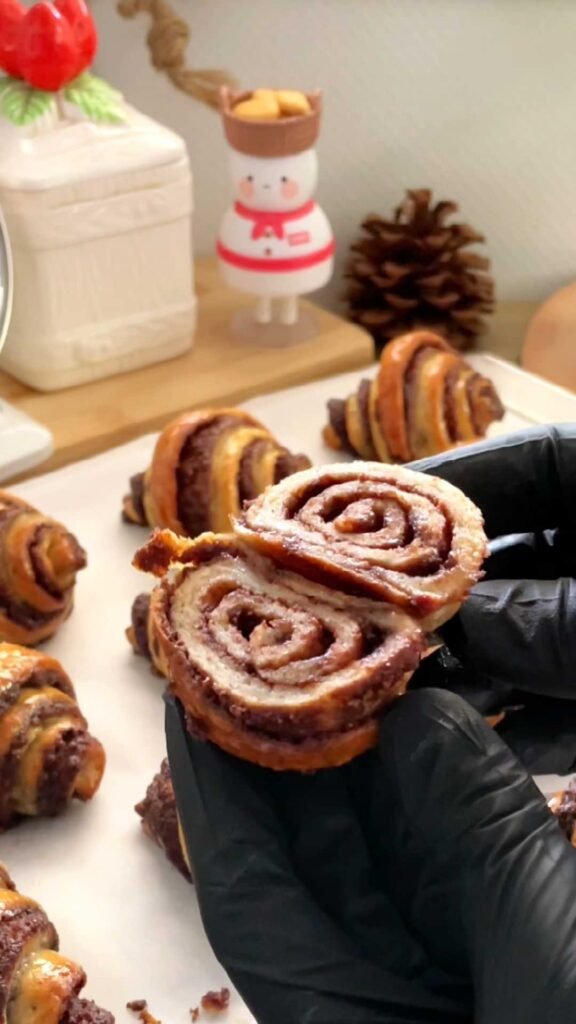
- The filling that will be used for this recipe is called “chocolate dough”. Which is exactly as it sounds. This dough is edible in itself, and taste like soft chocolate truffles. In making these rugelach, we’re in sort of a competition with the yeasts to see who’s working faster- us or them. We don’t have the leisure to mess around with fluid chocolate fillings or storebought chocolate spreads that need to be stabilized in the refrigerator, especially since working with a gluten free yeasted dough is not exactly like working with the usual wheat gluten yeasted dough. Therefore, we’re going to use the most stable chocolate filling there is, which also happens to be gluten free.
- The simple syrup is part of this recipe and must not be omitted.
I’ve had many chances to compare the results from all the times I was making these rugelach. Even after they turned out perfect the first time around, I repeated this recipe time and time again, to ensure the result is consistent and repetitive. I hope that after reading all of my instructions and explanations, your home-made gluten free rugelach will turn out chocolatey and soft, just as they have for me.
First published:
Last modified:
Gluten Free Rugelach:
Equipment: No special baking equipment is needed.
Recipe: 16 – 18 pieces
For gluten free rugelach yeasted dough:
| Ingredient | Amount (g / units) |
| Cornstarch | 32g |
| Tapioca Flour | 100g |
| White Rice Flour | 104g |
| Green Buckwheat Flour | 45g |
| Pea Protein Powder | 25g |
| Dry Yeasts | 6g (1 + 1/4 tsps) |
| Psyllium Husk | 12g |
| Xanthan Gum | 6g |
| White Granulated Sugar | 25g |
| Salt | 1/4 tsp |
| Water | 120g |
| Egg | 100g (2 Medium sized eggs) |
| Milk | 110g |
| Softened Unsalted Butter (Cubed) | 32g |
Filling (chocolate dough):
| Ingredient | Amount (g / units) |
| Dark Chocolate (55-60%) | 55g |
| Unsalted Butter | 31g |
| White Granulated Sugar | 61g |
| Heavy Cream (38%) | 12g |
| Dutch Processed Cocoa Powder | 4g |
| White Rice Flour | 34g |
| Almond Meal | 21g |
| Cinnamon | 1/4 tsp |
| Salt | 1/8 tsp |
Egg-wash:
Beaten egg with little bit of salt and a little bit of water.
Simple Syrup:
| Ingredient | Amount (g / units) |
| Boiling Water | 60g |
| White Granulated Sugar | 50g |
Preparation instructions:
Gluten free rugelach yeasted dough:
- In a separate bowl, thoroughly mix the psyllium husk with the water, and set it to the side until a gel forms. In the meantime, proceed with scaling the other ingredients.
- Into a standing mixer bowl, mix all the dry ingredients, including the yeasts (note that there are many dry ingredients in this recipe, and it is very easy to get confused, therefore work closely with the recipe).
- Add in the eggs and the psyllium gel. Start kneading using the paddle attachment, on the lowest speed, and gradually stream in the milk.
- As soon as a dough forms, gradually add in the softened butter.
- After having added all the butter, let the mixer continue kneading the dough for 5 minutes. Occasionally stop the mixer and using a spatula help it collect all the ingredients from the bottom of the bowl, to encourage even mixing.
Note: Depending on the size of your bowl, it might be ok to use the dough hook. In any case of doubling the recipe, using the dough hook to start kneading is ok. However, at some point the dough will become pasty, and in order to promote effective kneading, it is best to switch back to the paddle attachment. - The dough will seem uniform but it will be very sticky and unworkable. Transfer it on top of a large piece of plastic wrap, lightly greased with some oil spray. Using lightly wet hands, roughly shape the dough into a square. Lightly spray the top part with some oil, and cover it well from all sides with the plastic wrap.
- Refrigerate the dough for at least 6 hours, but it is highly recommended to let it rest overnight, refrigerated, before working with it.
For the filling (chocolate dough):
- Into a medium microwave safe bowl, add the chocolate and butter, and melt in pulses. Mix together to a smooth ganache.
- Add in the heavy cream and mix it well.
- Add the sugar, cocoa, salt, almond meal and rice flour, and mix them thoroughly. The mixture will be at a spreadable consistency, but after about 2 hours of leaving it at room temperature, it sets quite significantly and becomes like play-dough. Note that if the filling sets to hard, you can microwave it for a few seconds in the microwave. Knead it with a spoon or your hands to evenly disperse the moisture, and the texture will be nice to work with again.
Simple syrup:
Mix the boiling water with the sugar, until it is fully dissolved, and set to the site to cool down completely. The syrup must be used only when it is cold.
Assembly and baking:
- Pre-heat your oven to 175C (fan mode off), placing a baking rack at the middle shelf inside the oven.
- Ensure that your working counter is completely dry and doesn’t have a single drop of water on it. Dust your counter well with cornstarch. I recommend using a small sifter for even dusting.
- Place the chilled dough on top of the floured counter, and dust it with cornstarch as well.
- Using a rolling pin, roll the dough to a rectangle, sized 30cm (l) x 20cm (w), with the width side closer to you. Mark the mid-point of the dough at about 15cm.
- Flatten the chocolate dough with your hands, and place it on top the bottom half of the dough. Using your hands, arrange the chocolate dough so that it covers the bottom half all the way up to the mid-point marked earlier.
- Close the upper half of the dough on top of the filling, and seal the edges together.
- Gently lift the filled dough and dust your counter with a little bit more cornstarch.
- Roll the filled dough to a large rectangle, sized 50cm (l) x 30cm (w), with the length side closer to you.
During rolling the dough, the chocolate dough will be rolled along with the rugelach dough, and will evenly spread across.
While rolling the dough, occasionally lift the dough to ensure it doesn’t stick to the counter. It is not supposed to stick too much, unless it’s an area that was insufficiently floured. In any case dust more cornstarch as you go.
The dough needs to be at no less than 0.5cm thickness, otherwise it would tear before it even gets into the oven (which we’d like to avoid if we are striving to achieve good looking rugelach).
The dough should not tear at all if you’re working correctly, and it is something you can do by improving your rolling technique. In any case do not be disappointed if tearing will develop from time to time.
- The rolled dough will become thinner on its upper side, and you’ll be able to see the filling through it. Using a pizza cutter, cut the unfilled dough edges, to a rectangle about 42cm (l) x 25cm (w).
- Using the pizza cutter, mark 5cm wide segments at the length side of the dough. Mark 5cm segments at the other side as well, starting to mark from the mid-point of the parallel segment.
- Using a long ruler, connect the marks to cut evenly sized triangles.
- In order to maintain a neat presentation, gently lift each triangle, and examine which side developed less tearing. In most cases, the bottom side will be the one that is more perfect, so ensure it is facing down while rolling the triangles from their base to the edge to the shape of a rugelach. Rolling needs to be lightly tight but don’t overdo it because the dough is very fragile.
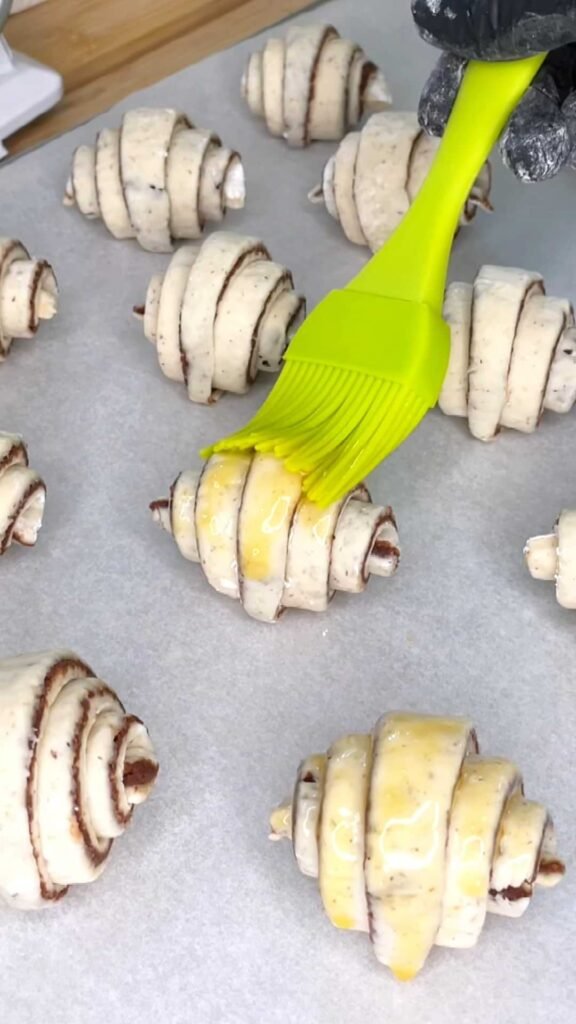
- Evenly space the rugelach on the baking sheet lined with parchment paper, and brush with the egg-wash from all sides. There’s no need for a second proofing stage before baking. As the yeasted dough doesn’t contain any gluten, it does not support maintaining the dough surface tension, which will cause the dough to tear.
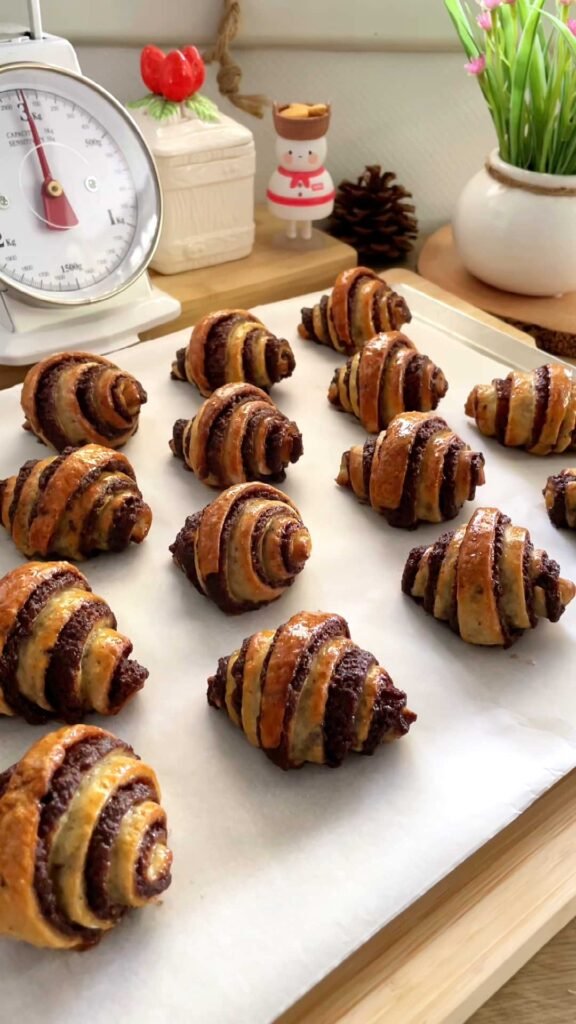
- Bake in the pre-heated oven for 12-14 minutes (my oven took 12 minutes to have them fully cooked).
- As soon as the rugelach come out of the oven, soak them with the cold simple syrup, and let them cool down a few minutes before serving.
Store in a sealed box, at room temperature. The rugelach should stay soft long after they are baked, but as with any other yeasted dough pastry, they can be re-heated a few seconds in the microwave to restore their softness.